本博文主要阐述了简易SpringMVC的框架的实现,本博文代码在手写建议Ioc框架的基础上实现,并实现了权限校验的处理。
实现原理
由原来的介绍,我们可知SpringMVC执行的大致原理如下图所示:
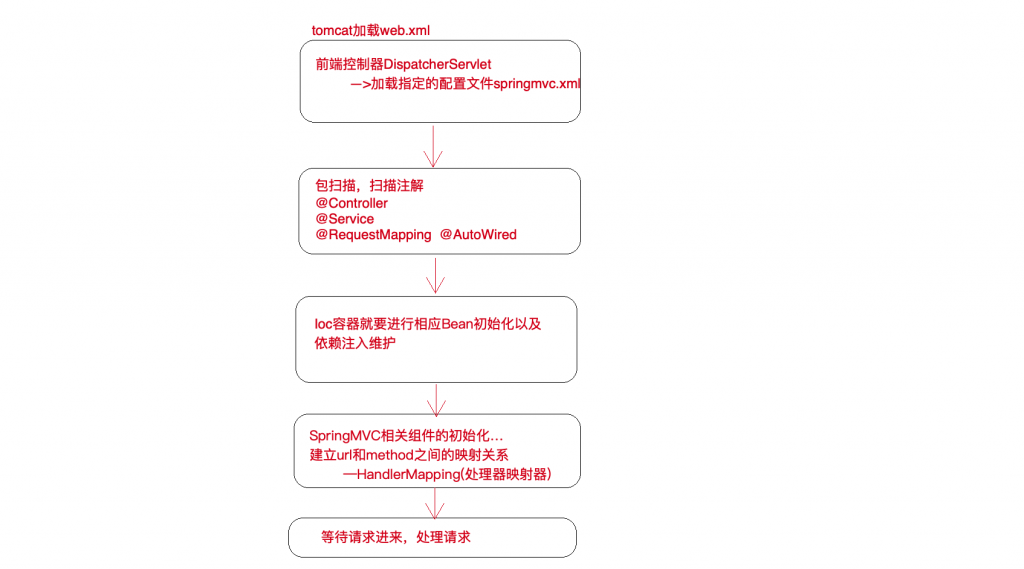
我们就按照上图来开发我们的SpringMVC框架。
自定义SpringMVC框架开发
准备工作
我们先来做一些准备工作。创建一个Maven工程,创建之后引入如下坐标:
<?xml version="1.0" encoding="UTF-8"?>
<project xmlns="http://maven.apache.org/POM/4.0.0"
         xmlns:xsi="http://www.w3.org/2001/XMLSchema-instance"
         xsi:schemaLocation="http://maven.apache.org/POM/4.0.0 http://maven.apache.org/xsd/maven-4.0.0.xsd">
    <parent>
        <artifactId>my-spring-demo</artifactId>
        <groupId>com.rubin</groupId>
        <version>1.0-SNAPSHOT</version>
    </parent>
    <modelVersion>4.0.0</modelVersion>

    <artifactId>my-spring-webmvc</artifactId>

    <dependencies>
        <dependency>
            <groupId>com.rubin</groupId>
            <artifactId>my-spring-context</artifactId>
            <version>1.0-SNAPSHOT</version>
        </dependency>
        <dependency>
            <groupId>javax.servlet</groupId>
            <artifactId>javax.servlet-api</artifactId>
            <version>3.1.0</version>
            <scope>provided</scope>
        </dependency>
        <dependency>
            <groupId>org.apache.commons</groupId>
            <artifactId>commons-lang3</artifactId>
            <version>3.9</version>
        </dependency>
        <dependency>
            <groupId>org.projectlombok</groupId>
            <artifactId>lombok</artifactId>
            <version>1.16.18</version>
            <scope>provided</scope>
        </dependency>
        <dependency>
            <groupId>com.alibaba</groupId>
            <artifactId>fastjson</artifactId>
            <version>1.2.61</version>
        </dependency>
    </dependencies>

</project>
框架开发
我们首先来开发DispatchServlet:
/**
 * 处理器映射器
 * Created by rubin on 4/4/21.
 */
public class DispatcherServlet extends HttpServlet {

    private ApplicationContext applicationContext;

    private List<Handler> handlerMapping = new ArrayList<>();

    private static final String SLASHES_REGEX_STR = "(^/+)|(/+$)";

    public DispatcherServlet() {

    }

    public DispatcherServlet(ApplicationContext applicationContext) {
        this.applicationContext = applicationContext;
    }

    @Override
    public void init(ServletConfig config) throws ServletException {
        if (this.applicationContext == null) {
            String contextConfigLocation = config.getInitParameter("contextConfigLocation");
            this.applicationContext = new ClassPathXmlApplicationContext(contextConfigLocation);
        }
        initHandlers();
    }

    @Override
    protected void doGet(HttpServletRequest req, HttpServletResponse resp) throws ServletException, IOException {
        doPost(req, resp);
    }

    @Override
    protected void doPost(HttpServletRequest req, HttpServletResponse resp) throws ServletException, IOException {
        Handler handler = getHandler(req);
        if (handler == null) {
            resp.getWriter().write("404 not found");
            return;
        }
        // 权限校验
        if (!checkSecurity(handler, req)) {
            try {
                resp.getWriter().write("you have no permission to pass");
                return;
            } catch (IOException e) {
                e.printStackTrace();
            }
        }
        // 处理请求
        handleRequest(handler, req, resp);
    }

    /**
     * 权限校验
     *
     * @param handler
     * @param req
     */
    private boolean checkSecurity(Handler handler, HttpServletRequest req) {
        Object restControllerInstance = applicationContext.getBean(handler.getControllerClass());
        Method method = handler.getMethod();
        if (!method.isAnnotationPresent(Security.class) && !restControllerInstance.getClass().isAnnotationPresent(Security.class)) {
            return true;
        }
        Security securityAnnotation;
        if (method.isAnnotationPresent(Security.class)) {
            securityAnnotation = method.getAnnotation(Security.class);
        } else {
            securityAnnotation = restControllerInstance.getClass().getAnnotation(Security.class);
        }
        String[] usernames = securityAnnotation.values();
        if (usernames.length == 0) {
            return false;
        }
        String usernameParam = req.getParameter("username");
        if (StringUtil.isBlank(usernameParam)) {
            return false;
        }
        for (int i = 0; i < usernames.length; i++) {
            if (usernames[i].equals(usernameParam)) {
                return true;
            }
        }
        return false;
    }

    /**
     * 处理请求
     *
     * @param handler
     * @param req
     * @param resp
     */
    private void handleRequest(Handler handler, HttpServletRequest req, HttpServletResponse resp) {
        // 参数绑定
        Class<?>[] parameterTypes = handler.getMethod().getParameterTypes();

        // 根据上述数组长度创建一个新的数组(参数数组,是要传入反射调用的)
        Object[] paraValues = new Object[parameterTypes.length];

        // 以下就是为了向参数数组中塞值,而且还得保证参数的顺序和方法中形参顺序一致
        Map<String, String[]> parameterMap = req.getParameterMap();

        // 遍历request中所有参数
        for (Map.Entry<String, String[]> param : parameterMap.entrySet()) {
            String value = StringUtils.join(param.getValue(), ",");

            // 如果参数和方法中的参数匹配上了,填充数据
            if (!handler.getParamIndexMapping().containsKey(param.getKey())) {
                continue;
            }

            // 方法形参确实有该参数,找到它的索引位置,对应的把参数值放入paraValues
            Integer index = handler.getParamIndexMapping().get(param.getKey());

            paraValues[index] = value;
        }

        Integer requestIndex = handler.getParamIndexMapping().get(HttpServletRequest.class.getSimpleName());
        if (requestIndex != null) {
            paraValues[requestIndex] = req;

        }
        Integer responseIndex = handler.getParamIndexMapping().get(HttpServletResponse.class.getSimpleName());
        if (responseIndex != null) {
            paraValues[responseIndex] = resp;

        }

        // 最终调用handler的method属性
        try {
            Object result = handler.getMethod().invoke(applicationContext.getBean(handler.getControllerClass()), paraValues);
            if (result != null) {
                resp.setContentType("application/json;charset=UTF-8");
                resp.getWriter().write(JSON.toJSONString(result));
            }
        } catch (IllegalAccessException e) {
            e.printStackTrace();
        } catch (InvocationTargetException e) {
            e.printStackTrace();
        } catch (IOException e) {
            e.printStackTrace();
        }
    }

    /**
     * 获取对应的处理器
     *
     * @param req
     * @return
     */
    private Handler getHandler(HttpServletRequest req) {
        if (handlerMapping.isEmpty()) {
            return null;
        }

        String url = req.getRequestURI();

        for (Handler handler : handlerMapping) {
            Matcher matcher = handler.getPattern().matcher(url);
            if (!matcher.matches()) {
                continue;
            }
            return handler;
        }
        return null;
    }

    /**
     * 初始化所有映射器
     */
    private void initHandlers() {
        String basePackage = "/";
        if (this.applicationContext instanceof ClassPathXmlApplicationContext) {
            ControllerScanner controllerScanner = (ControllerScanner) applicationContext.getBean(ControllerScanner.class);
            basePackage = controllerScanner.getBasePackage();
        } else if (this.applicationContext instanceof AnnotationApplicationContext) {
            basePackage = ((AnnotationApplicationContext) this.applicationContext).getAnnotationScanBasePackage();
        }
        Set<Class> restControllerClasses = ReflectUtil.getAllObjectClassWithAnnotationOrSubAnnotation(basePackage, RestController.class);
        if (CollectionUtil.isEmpty(restControllerClasses)) {
            return;
        }
        restControllerClasses.stream().forEach(restControllerClass -> initHandler(restControllerClass));
    }

    /**
     * 初始化映射器并加入映射器列表
     *
     * @param restControllerClass
     */
    private void initHandler(Class<?> restControllerClass) {
        String baseUrl = StringUtil.EMPTY;
        if (restControllerClass.isAnnotationPresent(RequestMapping.class)) {
            RequestMapping annotation = restControllerClass.getAnnotation(RequestMapping.class);
            baseUrl = handleUrlSlash(annotation.value());
        }
        Method[] declaredMethods = restControllerClass.getDeclaredMethods();
        for (int i = 0; i < declaredMethods.length; i++) {
            Method method = declaredMethods[i];
            if (!method.isAnnotationPresent(RequestMapping.class)) {
                continue;
            }
            String childUrl = method.getAnnotation(RequestMapping.class).value();
            String url = "";
            if (StringUtil.isNotBlank(baseUrl)) {
                url = "/" + baseUrl + "/" + handleUrlSlash(childUrl);
            } else {
                url = "/" + handleUrlSlash(childUrl);
            }
            Handler handler = new Handler();
            handler.setControllerClass(restControllerClass);
            handler.setMethod(method);
            handler.setPattern(Pattern.compile(url));
            handler.setParamIndexMapping(new ConcurrentHashMap<>());
            // 计算方法的参数位置信息
            Parameter[] parameters = method.getParameters();
            for (int j = 0; j < parameters.length; j++) {
                Parameter parameter = parameters[j];
                if (parameter.getType().equals(HttpServletRequest.class) || parameter.getType().equals(HttpServletResponse.class)) {
                    // 如果是request和response对象,那么参数名称写HttpServletRequest和HttpServletResponse
                    handler.getParamIndexMapping().put(parameter.getType().getSimpleName(), j);
                } else {
                    handler.getParamIndexMapping().put(parameter.getName(), j);
                }

            }
            handlerMapping.add(handler);
        }
    }

    /**
     * 将路径中起始和最终的斜杠(/)去掉,防止后面字符串拼接过程中出现多个斜杠
     *
     * @param url
     * @return
     */
    private String handleUrlSlash(String url) {
        return url.replaceAll(SLASHES_REGEX_STR, StringUtil.EMPTY);
    }

}
上述代码比较多,但是逻辑也比较简单。我们需要重点关注Handler的扫描以及初始化的过程和请求的处理过程。
我们再来定义上述代码中需要的支撑类:
/**
 * 封装url-method映射
 * Created by rubin on 4/4/21.
 */
@Data
public class Handler {

    private Class controllerClass;

    private Method method;

    private Pattern pattern;

    private Map<String,Integer> paramIndexMapping;

}
/**
* Controller扫描器
* Created by rubin on 4/4/21.
*/
@Data
public class ControllerScanner implements Serializable {
private static final long serialVersionUID = 7120297771274290039L;
private String basePackage;
}我们在来定义基础的注解:
/**
 * url映射器
 * Created by rubin on 4/4/21.
 */
@Documented
@Target({ElementType.TYPE, ElementType.METHOD})
@Retention(RetentionPolicy.RUNTIME)
public @interface RequestMapping {

    String value() default "";

}
/**
* Created by rubin on 4/4/21.
*/
@Documented
@Target(ElementType.TYPE)
@Retention(RetentionPolicy.RUNTIME)
@Component
public @interface RestController {
String value() default "";
}/**
* 权限控制注解
*/
@Documented
@Target({ElementType.TYPE, ElementType.METHOD})
@Retention(RetentionPolicy.RUNTIME)
public @interface Security {
String[] values() default {};
}客户端编写
准备工作
我们先来创建一个Maven的Web工程,引入如下坐标:
<?xml version="1.0" encoding="UTF-8"?>
<project xmlns="http://maven.apache.org/POM/4.0.0"
         xmlns:xsi="http://www.w3.org/2001/XMLSchema-instance"
         xsi:schemaLocation="http://maven.apache.org/POM/4.0.0 http://maven.apache.org/xsd/maven-4.0.0.xsd">
    <parent>
        <artifactId>my-spring-demo</artifactId>
        <groupId>com.rubin</groupId>
        <version>1.0-SNAPSHOT</version>
    </parent>
    <modelVersion>4.0.0</modelVersion>

    <artifactId>my-spring-mybatis-webmvc-client</artifactId>

    <dependencies>
        <dependency>
            <groupId>com.rubin</groupId>
            <artifactId>my-spring-mybatis</artifactId>
            <version>1.0-SNAPSHOT</version>
        </dependency>
        <dependency>
            <groupId>com.rubin</groupId>
            <artifactId>my-spring-webmvc</artifactId>
            <version>1.0-SNAPSHOT</version>
        </dependency>
        <dependency>
            <groupId>org.projectlombok</groupId>
            <artifactId>lombok</artifactId>
            <version>1.16.18</version>
            <scope>provided</scope>
        </dependency>
    </dependencies>

    <build>
        <plugins>
            <!--编译插件定义编译细节-->
            <plugin>
                <groupId>org.apache.maven.plugins</groupId>
                <artifactId>maven-compiler-plugin</artifactId>
                <version>3.1</version>
                <configuration>
                    <source>8</source>
                    <target>8</target>
                    <encoding>utf-8</encoding>
                    <!--告诉编译器,编译的时候记录下形参的真实名称-->
                    <compilerArgs>
                        <arg>-parameters</arg>
                    </compilerArgs>
                </configuration>
            </plugin>
        </plugins>
    </build>

</project>
注意:我们一定要在客户端配置Maven的编译参数设置,否则参数绑定会有问题。
我们再来配置web.xml:
<!DOCTYPE web-app PUBLIC
        "-//Sun Microsystems, Inc.//DTD Web Application 2.3//EN"
        "http://java.sun.com/dtd/web-app_2_3.dtd" >

<web-app>
    <display-name>Archetype Created Web Application</display-name>

    <servlet>
        <servlet-name>mvc</servlet-name>
        <servlet-class>com.rubin.spring.mvc.servlet.DispatcherServlet</servlet-class>
        <init-param>
            <param-name>contextConfigLocation</param-name>
            <param-value>applicationContext.xml</param-value>
        </init-param>
    </servlet>

    <servlet-mapping>
        <servlet-name>mvc</servlet-name>
        <url-pattern>/*</url-pattern>
    </servlet-mapping>

</web-app>
至此,我们的准备工作就做完了。
配置自定义的ORM框架
首先,我们创建数据库操作接口:
/**
 * dao层接口
 * 必须有mapper注解 否则解析不到
 */
@Mapper
public interface IAccountInfoDao {

    /**
     * 通过卡号查询帐户信息
     *
     * @param accountInfo
     * @return
     */
    AccountInfo selectByCardNo(AccountInfo accountInfo);

    /**
     * 更新帐户信息
     *
     * @param accountInfo
     */
    void updateByCardNo(AccountInfo accountInfo);

}
再来创建表实体:
/**
 * 帐户信息实体
 */
@Data
@Accessors(chain = true)
public class AccountInfo implements Serializable {

    private static final long serialVersionUID = -4486359278073035660L;

    /**
     * 主键
     */
    private Integer id;

    /**
     * 用户名
     */
    private String username;

    /**
     * 卡号
     */
    private String cardNo;

    /**
     * 账户余额
     */
    private BigDecimal money;

}
创建映射文件(IAccountInfo.xml)以及表:
<mapper namespace="com.rubin.client.dao.IAccountInfoDao">

    <select id="selectByCardNo" resultType="com.rubin.client.pojo.AccountInfo" parameterType="com.rubin.client.pojo.AccountInfo">
        SELECT
            id,
            username,
            card_no AS cardNo,
            money
        FROM
            account_info
        WHERE
            card_no = #{cardNo}
    </select>

    <update id="updateByCardNo" parameterType="com.rubin.client.pojo.AccountInfo">
        UPDATE account_info SET money = #{money} WHERE card_no = #{cardNo}
    </update>

</mapper>
create schema `transfer-demo` collate utf8_general_ci;
use `transfer-demo`;
create table account_info
(
id int auto_increment comment '主键'
primary key,
username varchar(255) default '' not null comment '用户名称',
card_no varchar(255) default '' not null comment '银行卡号',
money decimal(10,2) default 0.00 not null comment '余额'
)
comment '账户信息表';
insert into account_info (username, card_no, money) values ('张三', 'NO123456789', 10000.00), ('李四', 'NO987654321', 10000.00);创建我们的Ioc配置文件,并配置我们的自定义ORM框架:
<beans>

    <!--配置数据源-->
    <bean id="dataSource" class="com.mchange.v2.c3p0.ComboPooledDataSource">
        <property name="driverClass" value="com.mysql.jdbc.Driver"></property>
        <property name="jdbcUrl" value="jdbc:mysql:///transfer-demo"></property>
        <property name="user" value="root"></property>
        <property name="password" value="123456"></property>
    </bean>

    <!--配置数据库连接工厂-->
    <bean id="connectionFactory" class="com.rubin.spring.mybatis.connection.ThreadConnectionFactory">
        <property name="dataSource" ref="dataSource"></property>
    </bean>

    <!--配置事务管理器-->
    <bean id="transactionManager" class="com.rubin.spring.mybatis.manager.MybatisTransactionManager">
        <property name="connectionFactory" ref="connectionFactory"></property>
    </bean>

    <!--配置Mybatis配置类-->
    <bean id="configuration" class="com.rubin.mybatis.pojo.Configuration">
        <property name="dataSource" ref="dataSource"></property>
    </bean>

    <!--配置sqlSessionFactory-->
    <bean id="sqlSessionFactory" class="com.rubin.mybatis.sqlsession.DefaultSqlSessionFactory" init-method="init">
        <property name="configuration" ref="configuration"></property>
        <property name="connectionFactory" ref="connectionFactory"></property>
        <property name="mapperBasePackage" value="mappers"></property>
    </bean>

    <!--配置mapperScanner-->
    <bean id="mapperScanner" class="com.rubin.spring.mybatis.scanner.MapperScanner">
        <property name="mapperLocation" value="com.rubin.client.dao"></property>
    </bean>

    <!--开启注解扫描 不配置注解注入将失效-->
    <component-scan base-package="com.rubin.client"></component-scan>

</beans>
编写业务处理层
这一层比较简单,就是创建逻辑处理的代码。代码如下:
/**
 * 账户信息处理类接口
 */
public interface IAccountService {

    /**
     * 通过卡号获取账户详情
     *
     * @param cardNo
     * @return
     */
    AccountInfo getByCardNo(String cardNo);

    /**
     * 转账
     *
     * @param fromCardNo
     * @param toCardNo
     * @param money
     * @throws UndeclaredThrowableException
     */
    void transfer(String fromCardNo, String toCardNo, BigDecimal money);

}
**
* jdk动态代理测试类
* 主要测试方法级事务的控制
*/
@Service(value = "accountService")
public class AccountServiceImpl implements IAccountService {
@Autowired
private IAccountInfoDao iAccountInfoDao;
/**
* 通过卡号获取账户详情
*
* @param cardNo
* @return
*/
@Override
public AccountInfo getByCardNo(String cardNo) {
AccountInfo accountInfo = new AccountInfo();
accountInfo.setCardNo(cardNo);
return iAccountInfoDao.selectByCardNo(accountInfo);
}
/**
* 转账
*
* @param fromCardNo
* @param toCardNo
* @param money
* @throws UndeclaredThrowableException
*/
@Transactional
@Override
public void transfer(String fromCardNo, String toCardNo, BigDecimal money) {
AccountInfo accountInfo = new AccountInfo();
accountInfo.setCardNo(fromCardNo);
AccountInfo from = iAccountInfoDao.selectByCardNo(accountInfo);
accountInfo.setCardNo(toCardNo);
AccountInfo to = iAccountInfoDao.selectByCardNo(accountInfo);
from.setMoney(from.getMoney().subtract(money));
to.setMoney(to.getMoney().add(money));
iAccountInfoDao.updateByCardNo(from);
iAccountInfoDao.updateByCardNo(to);
}
}创建表现层代码
最后创建我们的表现层代码,我们首先在Ioc配置文件中注入我们的ControllerScanner类,以供DispatchServlet初始化使用:
<beans>

    <!--配置数据源-->
    <bean id="dataSource" class="com.mchange.v2.c3p0.ComboPooledDataSource">
        <property name="driverClass" value="com.mysql.jdbc.Driver"></property>
        <property name="jdbcUrl" value="jdbc:mysql:///transfer-demo"></property>
        <property name="user" value="root"></property>
        <property name="password" value="123456"></property>
    </bean>

    <!--配置数据库连接工厂-->
    <bean id="connectionFactory" class="com.rubin.spring.mybatis.connection.ThreadConnectionFactory">
        <property name="dataSource" ref="dataSource"></property>
    </bean>

    <!--配置事务管理器-->
    <bean id="transactionManager" class="com.rubin.spring.mybatis.manager.MybatisTransactionManager">
        <property name="connectionFactory" ref="connectionFactory"></property>
    </bean>

    <!--配置Mybatis配置类-->
    <bean id="configuration" class="com.rubin.mybatis.pojo.Configuration">
        <property name="dataSource" ref="dataSource"></property>
    </bean>

    <!--配置sqlSessionFactory-->
    <bean id="sqlSessionFactory" class="com.rubin.mybatis.sqlsession.DefaultSqlSessionFactory" init-method="init">
        <property name="configuration" ref="configuration"></property>
        <property name="connectionFactory" ref="connectionFactory"></property>
        <property name="mapperBasePackage" value="mappers"></property>
    </bean>

    <!--配置mapperScanner-->
    <bean id="mapperScanner" class="com.rubin.spring.mybatis.scanner.MapperScanner">
        <property name="mapperLocation" value="com.rubin.client.dao"></property>
    </bean>

    <!--配置controllerScanner-->
    <bean id="controllerScanner" class="com.rubin.spring.mvc.scanner.ControllerScanner">
        <property name="basePackage" value="com.rubin.client.controller"></property>
    </bean>

    <!--开启注解扫描 不配置注解注入将失效-->
    <component-scan base-package="com.rubin.client"></component-scan>

</beans>
配置好之后,我们创建表现层的代码:
/**
 * Created by rubin on 4/4/21.
 */
@RestController
@RequestMapping("test")
public class TestController {

    @Autowired
    private IAccountService iAccountService;

    /**
     * 只有zhangsan lisi两个用户可以调用
     *
     * @param cardNo
     * @return
     */
    @Security(values = {"zhangsan", "lisi"})
    @RequestMapping("get")
    public AccountInfo get(String cardNo) {
        return iAccountService.getByCardNo(cardNo);
    }

    /**
     * 任何人都可以调用
     *
     * @param username
     * @return
     */
    @RequestMapping("get1")
    public String get1(String username) {
        return "hello " + username;
    }

    /**
     * 任何用户都不可以调用
     *
     * @return
     */
    @Security
    @RequestMapping("get2")
    public String get2() {
        return "hello";
    }

}
至此,我们的测试客户端也就编写完成了。测试就很简单了,将这个测试工程发布到Tomcat下运行测试就可以了。在此不再赘述。

文章评论
顶