什么是RPC
RPC全称为remote procedure call,及远程过程调用。借助RPC可以做到像本地调用一样调用远程服务,是一种进程间的通信方式。
比如两台服务器A和B,A服务器上部署一个应用,B服务器上部署一个应用。A服务器上的应用想要调用B服务器上的应用提供的方法,就需要通过网络来表达调用的语义和传达调用的数据。需要注意的是RPC并不是一个具体的技术,而是指整个网络远程调用的过程。
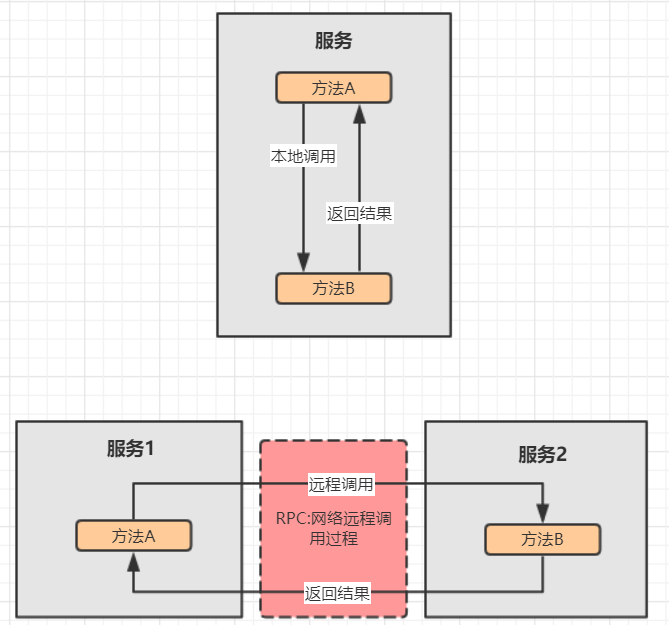
一个完整的RPC架构里面包含了四个核心组件,分别是Client,Client Stub,Server以及Server Stub,这个Stub可以理解为存根。
- 客户端(Client),服务的调用方
- 客户端存根(Client Stub),存放服务端的地址消息,再将客户端的请求参数打包成网络信息,然后通过网络远程发送给服务方
- 服务端(Server),真正的服务提供者
- 服务端存根(Server Stub),接收客户端发送过来的消息,将消息解包,并调用本地的方法
具体的调用过程如下:
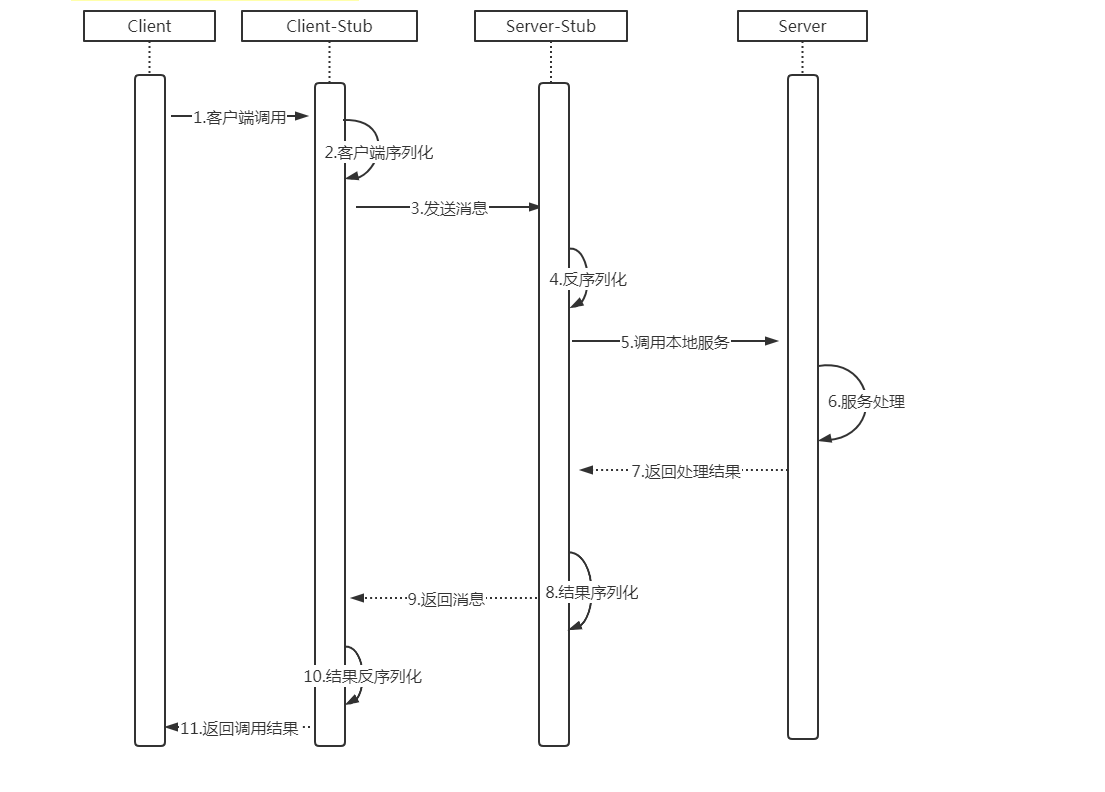
- 客户端(Client)以本地调用方式(即以接口的方式)调用服务
- 客户端存根(Client Stub)接收到调用后,负责将方法参数等组装成能够进行网络传输的消息体(将消息体对象序列化成二进制)
- 客户端通过Socket将消息发送到服务端
- 服务端存根(Server Stub)收到消息后进行解码(将消息对象反序列化)
- 服务端存根(Server Stub)根据解码结果调用本地的服务
- 服务处理
- 本地服务执行并将结果返回给服务端存根(Server Stub)
- 服务端存根(Server Stub)将返回结果打包成消息(将结果消息对象序列化)
- 服务端(Server)通过Socket将消息发送到客户端
- 客户端存根(Client Stub)接收到结果消息,并进行解码(将结果消息序列化)
- 客户端(Client)得到最终结果
RPC的目标是要把2、3、4、5、7、8、9、10这些步骤都封装起来,只剩下1、6、11。在Java中RPC框架比较多,常见的有Hession、gRPC、Dubbo等等。
RMI
原理讲解
Java RMI,即远程方法调用(Remote Method Invocation),一种用于实现远程过程调用(RPC-Remote procedure call)的Java API, 能直接传输序列化后的Java对象。它的实现依赖于Java虚拟机,因此它仅支持从一个JVM到另一个JVM的调用。

调用步骤如下:
- 客户端从远程服务器的注册表中查询并获取远程对象引用
- 桩对象与远程对象具有相同的接口和方法列表,当客户端调用远程对象时,实际上是由相应的桩对象代理完成的
- 远程引用层在将桩的本地引用转换为服务器上对象的远程引用后,再将调用传递给传输层(Transport),由传输层通过TCP协议发送调用
- 在服务器端,传输层监听入站连接,它一旦接收到客户端远程调用后,就将这个引用转发给其上层的远程引用层
- 服务器端的远程引用层将客户端发送的远程应用转换为本地虚拟机的引用后,再将请求传递给骨架(Skeleton)
- 骨架读取参数,又将请求传递给服务器,最后由服务器进行实际的方法调用
- 如果远程方法调用后有返回值,则服务器将这些结果又沿着“骨架->远程引用层->传输层”向下传递
- 客户端的传输层接收到返回值后,又沿着“传输层->远程引用层->桩”向上传递,然后由桩来反序列化这些返回值,并将最终的结果传递给客户端程序
代码示例
接口、实体类以及业务实现类如下:
@Data
public class User implements Serializable {

    private Long id;

    private String username;

}
public interface IUserService extends Remote {
User getById(Long id) throws RemoteException;
}public class UserServiceImpl extends UnicastRemoteObject implements IUserService {
private Map<Long, User> userMap = new HashMap();
protected UserServiceImpl() throws RemoteException {
super();
User user1 = new User();
user1.setId(1L);
user1.setUsername("张三");
User user2 = new User();
user2.setId(2L);
user2.setUsername("李四");
userMap.put(user1.getId(), user1);
userMap.put(user2.getId(), user2);
}
@Override
public User getById(Long id) throws RemoteException {
return userMap.get(id);
}
}服务端代码如下:
@Slf4j
public class RMIServer {

    public static void main(String[] args) {
        try {
            Registry registry = LocateRegistry.createRegistry(9998);
            IUserService iUserService = new UserServiceImpl();
            registry.rebind("userService", iUserService);
            log.info("The RMI server listened on port 9998");
        } catch (RemoteException e) {
            e.printStackTrace();
        }
    }

}
客户端代码如下:
@Slf4j
public class RMIClient {

    public static void main(String[] args) {
        try {
            Registry registry = LocateRegistry.getRegistry("127.0.0.1", 9998);
            IUserService iUserService = (IUserService) registry.lookup("userService");
            iUserService.getById(1L);
            User user = iUserService.getById(1L);
            log.info("Get the user entity with id 1L:{}", user);
        } catch (RemoteException e) {
            e.printStackTrace();
        } catch (NotBoundException e) {
            e.printStackTrace();
        }
    }

}
基于Netty实现RPC框架
需求介绍
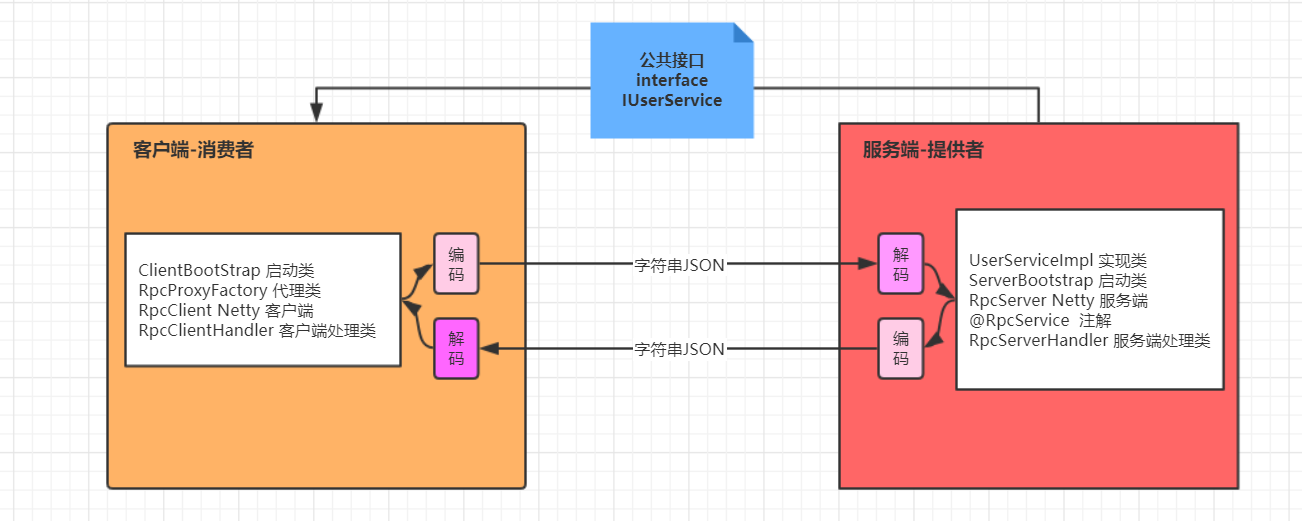
Dubbo 底层使用了 Netty 作为网络通讯框架,要求用 Netty 实现一个简单的 RPC 框架,消费者和提供者约定接口和协议,消费者远程调用提供者的服务。
实现步骤如下:
- 创建一个接口,定义抽象方法。用于消费者和提供者之间的约定
- 创建一个提供者,该类需要监听消费者的请求,并按照约定返回数据
- 创建多个消费者去并发调用消费者,该类需要透明的调用自己不存在的方法,内部需要使用 Netty 进行数据通信
- 提供者与消费者数据传输使用json字符串数据格式
代码实现
我们要使用包扫描来扫描自定义注解的服务提供者,所以引入如下依赖:
<dependency>
    <groupId>com.alibaba</groupId>
    <artifactId>fastjson</artifactId>
    <version>1.2.73</version>
</dependency>
<dependency>
    <groupId>org.projectlombok</groupId>
    <artifactId>lombok</artifactId>
    <version>1.18.20</version>
</dependency>
<dependency>
    <groupId>ch.qos.logback</groupId>
    <artifactId>logback-classic</artifactId>
    <version>1.2.5</version>
</dependency>
<dependency>
    <groupId>io.netty</groupId>
    <artifactId>netty-all</artifactId>
    <version>4.1.67.Final</version>
</dependency>
<dependency>
    <groupId>org.reflections</groupId>
    <artifactId>reflections</artifactId>
    <version>0.9.12</version>
</dependency>
实体类、自定义注解、接口、服务实现如下:
@Data
public class User implements Serializable {

    private Long id;

    private String username;

}
@Target(ElementType.TYPE)
@Retention(RetentionPolicy.RUNTIME)
public @interface RpcService {
}
public interface IUserService {
User getById(Long id);
}@RpcService
public class UserServiceImpl implements IUserService {
private Map<Long, User> userMap = new HashMap();
public UserServiceImpl() {
super();
User user1 = new User();
user1.setId(1L);
user1.setUsername("张一");
User user2 = new User();
user2.setId(2L);
user2.setUsername("王二");
User user3 = new User();
user3.setId(3L);
user3.setUsername("李三");
User user4 = new User();
user4.setId(4L);
user4.setUsername("赵四");
User user5 = new User();
user5.setId(5L);
user5.setUsername("楚五");
User user6 = new User();
user6.setId(6L);
user6.setUsername("和六");
User user7 = new User();
user7.setId(7L);
user7.setUsername("贺七");
User user8 = new User();
user8.setId(8L);
user8.setUsername("钱八");
User user9 = new User();
user9.setId(9L);
user9.setUsername("陈九");
User user10 = new User();
user10.setId(10L);
user10.setUsername("薛十");
userMap.put(user1.getId(), user1);
userMap.put(user2.getId(), user2);
userMap.put(user3.getId(), user3);
userMap.put(user4.getId(), user4);
userMap.put(user5.getId(), user5);
userMap.put(user6.getId(), user6);
userMap.put(user7.getId(), user7);
userMap.put(user8.getId(), user8);
userMap.put(user9.getId(), user9);
userMap.put(user10.getId(), user10);
}
@Override
public User getById(Long id) {
return userMap.get(id);
}
}再来定义我们自定义的请求、响应实体:
@Data
public class Request implements Serializable {

    private String requestId;

    private String className;

    private String methodName;

    private Class<?>[] parameterTypes;

    private Object[] args;

}
@Data
public class Response implements Serializable {

    private String requestId;

    private Object result;

}
定义我们的服务端代码:
@Slf4j
public class RpcServer {

    private NioEventLoopGroup bossGroup;

    private NioEventLoopGroup workerGroup;

    private Integer port;

    private RpcServerHandler rpcServerHandler = new RpcServerHandler();

    public RpcServer(Integer port) {
        this.port = port;
        this.bossGroup = new NioEventLoopGroup(1);
        this.workerGroup = new NioEventLoopGroup(20);
    }

    /**
     * 启动服务区
     */
    public void start() {
        ServerBootstrap serverBootstrap = new ServerBootstrap();
        serverBootstrap.group(this.bossGroup, this.workerGroup)
                       .channel(NioServerSocketChannel.class)
                       .childHandler(new ChannelInitializer<SocketChannel>() {
                           @Override
                           protected void initChannel(SocketChannel socketChannel) throws Exception {
                               socketChannel.pipeline().addLast(new DelimiterBasedFrameDecoder(102400, Unpooled.copiedBuffer("__,__", CharsetUtil.UTF_8)));
                               socketChannel.pipeline().addLast(new StringDecoder());
                               socketChannel.pipeline().addLast(new StringEncoder());
                               socketChannel.pipeline().addLast(rpcServerHandler);
                           }
                       })
                       .option(ChannelOption.SO_BACKLOG, 256)
                       .childOption(ChannelOption.SO_KEEPALIVE, Boolean.TRUE);
        try {
            ChannelFuture channelFuture = serverBootstrap.bind(this.port).sync();
            log.info("The rpc server startup success, listened on port : {}", this.port);
            channelFuture.channel().closeFuture().sync();
            Runtime.getRuntime().addShutdownHook(new Thread(() -> RpcServer.this.close()));
        } catch (InterruptedException e) {
            e.printStackTrace();
        }
    }

    /**
     * 关闭服务器
     */
    public void close() {
        if (this.bossGroup != null) {
            this.bossGroup.shutdownGracefully();
        }
        if (this.workerGroup != null) {
            this.workerGroup.shutdownGracefully();
        }
    }

    public static void main(String[] args) {
        RpcServer rpcServer = new RpcServer(9200);
        rpcServer.start();
    }

}
@Sharable
public class RpcServerHandler extends SimpleChannelInboundHandler<String> {
private Map<String, Object> INSTANCES = new HashMap<>(256);
public RpcServerHandler() {
Reflections reflections = new Reflections("com.rubin.mvn.demos.rpc.netty");
final Set<Class<?>> annotatedClasses = reflections.getTypesAnnotatedWith(RpcService.class);
if (annotatedClasses != null && !annotatedClasses.isEmpty()) {
for (Class<?> annotatedClass : annotatedClasses) {
Class<?>[] interfaces = annotatedClass.getInterfaces();
if (interfaces == null || interfaces.length == 0) {
throw new RuntimeException(
"there are no interface be implemented with the class " + annotatedClass.getSimpleName());
}
try {
INSTANCES.put(interfaces[0].getSimpleName(),
annotatedClass.getDeclaredConstructor(null).newInstance(null));
} catch (InstantiationException e) {
e.printStackTrace();
} catch (IllegalAccessException e) {
e.printStackTrace();
} catch (InvocationTargetException e) {
e.printStackTrace();
} catch (NoSuchMethodException e) {
e.printStackTrace();
}
}
}
}
@Override
protected void channelRead0(ChannelHandlerContext ctx, String msg) throws Exception {
Request request = JSON.parseObject(msg, Request.class);
Object instance = INSTANCES.get(request.getClassName());
if (instance == null) {
throw new RuntimeException("the class " + request.getClassName() + " is not a valid service");
}
Method declaredMethod =
instance.getClass().getDeclaredMethod(request.getMethodName(), request.getParameterTypes());
if (declaredMethod == null) {
throw new RuntimeException(
"there are no method named " + request.getMethodName() + " in class " + request.getClassName());
}
Object result = declaredMethod.invoke(instance, handleNumberArgs(request.getParameterTypes(), request.getArgs()));
Response response = new Response();
response.setRequestId(request.getRequestId());
response.setResult(result);
ctx.writeAndFlush(JSON.toJSONString(response) + "__,__");
}
private Object[] handleNumberArgs(Class[] argTypes, Object[] args) {
if (args == null || args.length == 0) {
return args;
}
Object[] newArgs = new Object[args.length];
for (int i = 0; i < args.length; i++) {
Object arg = args[i];
if (arg instanceof Number) {
newArgs[i] = castNumber(argTypes[i], arg);
}
}
return newArgs;
}
private Object castNumber(Class argType, Object arg) {
if (argType.equals(arg.getClass())) {
return arg;
}
Number number = (Number) arg;
if (argType.equals(Byte.class)) {
return number.byteValue();
} else if (argType.equals(Short.class)) {
return number.shortValue();
} else if (argType.equals(Short.class)) {
return number.shortValue();
} else if (argType.equals(Integer.class)) {
return number.intValue();
} else if (argType.equals(Long.class)) {
return number.longValue();
} else if (argType.equals(Float.class)) {
return number.floatValue();
} else {
return number.doubleValue();
}
}
}
这里需要注意的是,反射调用前的数字类型转换问题。因为JSON反序列化后,会有将Long类型的参数转化成Integer的风险。
再定义客户端之前,我们需要先定义好Netty的客户端和业务处理。在定义之前我们要想,Netty是一个非阻塞IO模型,我们的远程调用是需要同步进行的,所以我们采用发送请求->返回自定义异步Future并阻塞->读取返回结果,设置异步Futrue并唤醒线程的方式来解决此问题。我们先来定义我们的自定义异步结果类:
public class RequestFuture {

    private CountDownLatch countDownLatch = new CountDownLatch(1);

    private Response response;

    public Response get() {
        try {
            countDownLatch.await();
        } catch (InterruptedException e) {
            e.printStackTrace();
        } finally {
            return response;
        }
    }

    public void over(Response response) {
        this.response = response;
        countDownLatch.countDown();
    }

}
利用CountdownLatch来阻塞并唤起线程。再来定义我们的Netty客户端:
public class RpcClient {

    private NioEventLoopGroup workerGroup;

    private Integer port;

    private Channel channel;

    private RpcClientHandler rpcClientHandler = new RpcClientHandler();

    public RpcClient(Integer port) {
        this.workerGroup = new NioEventLoopGroup();
        this.port = port;
        start();
    }

    /**
     * 启动客户端
     */
    public void start() {
        Bootstrap bootstrap = new Bootstrap();
        bootstrap.group(this.workerGroup)
                 .channel(NioSocketChannel.class)
                 .handler(new ChannelInitializer<SocketChannel>() {
                     @Override
                     protected void initChannel(SocketChannel socketChannel) throws Exception {
                         socketChannel.pipeline().addLast(new StringEncoder());
                         socketChannel.pipeline().addLast(new DelimiterBasedFrameDecoder(102400,
                                                                                         Unpooled.copiedBuffer("__,__",
                                                                                                               CharsetUtil.UTF_8)));
                         socketChannel.pipeline().addLast(new StringDecoder());
                         socketChannel.pipeline().addLast(rpcClientHandler);
                     }
                 });
        try {
            channel = bootstrap.connect(new InetSocketAddress("127.0.0.1", this.port)).sync().channel();
        } catch (InterruptedException e) {
            e.printStackTrace();
            close();
        }
    }

    /**
     * 关闭客户端
     */
    public void close() {
        if (this.workerGroup != null) {
            this.workerGroup.shutdownGracefully();
        }
        if (this.channel != null) {
            this.channel.close();
        }
    }

    /**
     * 发送请求
     *
     * @param request
     *
     * @return
     *
     * @throws ExecutionException
     * @throws InterruptedException
     */
    public synchronized RequestFuture sendRequest(Request request) {
        return rpcClientHandler.sendRequest(request);
    }

}
上面的代码我们可以看到,我们不可能为每一个请求线程去实例化一个客户端,请求结束关掉连接,这样太浪费资源。所以我们的客户端是单例的,单例实体就要考虑线程安全问题,所以我们在发送请求方法上面加上同步锁来保证发送请求是顺序的,我们发送请求是非阻塞的,所以此处同步不会影响程序性能。
接下来我们定义业务处理类:
@Data
public class RpcClientHandler extends SimpleChannelInboundHandler<String> {

    private ChannelHandlerContext ctx;

    private CountDownLatch countDownLatch;

    private Map<String, RequestFuture> requestFutureMap = new ConcurrentHashMap<>(256);

    private volatile boolean ready = false;

    @Override
    protected synchronized void channelRead0(ChannelHandlerContext ctx, String msg) throws Exception {
        Response response = JSON.parseObject(msg, Response.class);
        RequestFuture requestFuture = requestFutureMap.get(response.getRequestId());
        requestFuture.over(response);
    }

    @Override
    public void channelActive(ChannelHandlerContext ctx) throws Exception {
        super.channelActive(ctx);
        this.ctx = ctx;
        this.ready = true;
    }

    public RequestFuture sendRequest(Request request) {
        while (!ready) {

        }
        RequestFuture requestFuture = new RequestFuture();
        requestFutureMap.put(request.getRequestId(), requestFuture);
        this.ctx.writeAndFlush(JSON.toJSONString(request) + "__,__");
        return requestFuture;
    }

}
该类中,我们需要注意的点是我们需要连接好服务器再发送请求数据,所以我们是使用while循环来阻塞连接未准备好的情况。发送完数据,我们将当前的异步自定义结果对象和请求ID对应起来来保证响应来的时候,根据响应体中的请求ID来唤醒对应阻塞请求线程并返回响应结果。
由于我们的RPC客户端是单例的,我们可以定义一个Holder对象来管理我们的单例对象:
public class RpcClientProvider {

    private static final RpcClient INSTANCE = new RpcClient(9200);

    public static RpcClient provide() {
        return INSTANCE;
    }

}
至此,我们的客户端就定义完了。接下来我们需要定义Client Stub对象,也就是存根对象。说白了,就是给共用接口创建一个动态代理对象,该动态代理对象将接口方法封装成Request对象使用RPCClient去发送请求,并将Response对象解析返回:
public class RemoteCallProxy {

    public static Object createProxy(Class serviceClass) {
        return Proxy.newProxyInstance(Thread.currentThread().getContextClassLoader(), new Class[] { serviceClass },
                                      (proxy, method, args) -> {
                                          Request request = new Request();
                                          request.setRequestId(UUID.randomUUID().toString());
                                          request.setClassName(method.getDeclaringClass().getSimpleName());
                                          request.setMethodName(method.getName());
                                          request.setParameterTypes(method.getParameterTypes());
                                          request.setArgs(args);
                                          RpcClient rpcClient = RpcClientProvider.provide();
                                          RequestFuture requestFuture = rpcClient.sendRequest(request);
                                          return JSON.parseObject(JSON.toJSONString(requestFuture.get().getResult()),
                                                                  method.getReturnType());
                                      });
    }

}
至此,我们基于Netty的RPC简易框架就开发完成了。我们测试一下。
测试框架
我们定义一个测试类,并并发10个线程同时发送请求,看看我们的框架在高并发场景下是否能正确处理出具:
public class RpcMain {

    public static void main(String[] args) {
        CountDownLatch countDownLatch = new CountDownLatch(10);
        for (Long l = 1L; l <= 10; l++) {
            new GetUserRequest(l, countDownLatch).start();
        }
        try {
            countDownLatch.await();
        } catch (InterruptedException e) {
            e.printStackTrace();
        }
        RpcClientProvider.provide().close();
    }

    @AllArgsConstructor
    private static class GetUserRequest extends Thread {

        private Long id;

        private CountDownLatch countDownLatch;

        @Override
        public void run() {
            super.run();
            IUserService iUserService = (IUserService) RemoteCallProxy.createProxy(IUserService.class);
            System.out.println(iUserService.getById(id));
            countDownLatch.countDown();
        }

    }

}
启动服务端,在启动我们的测试类我们可以看到调用结果如下:
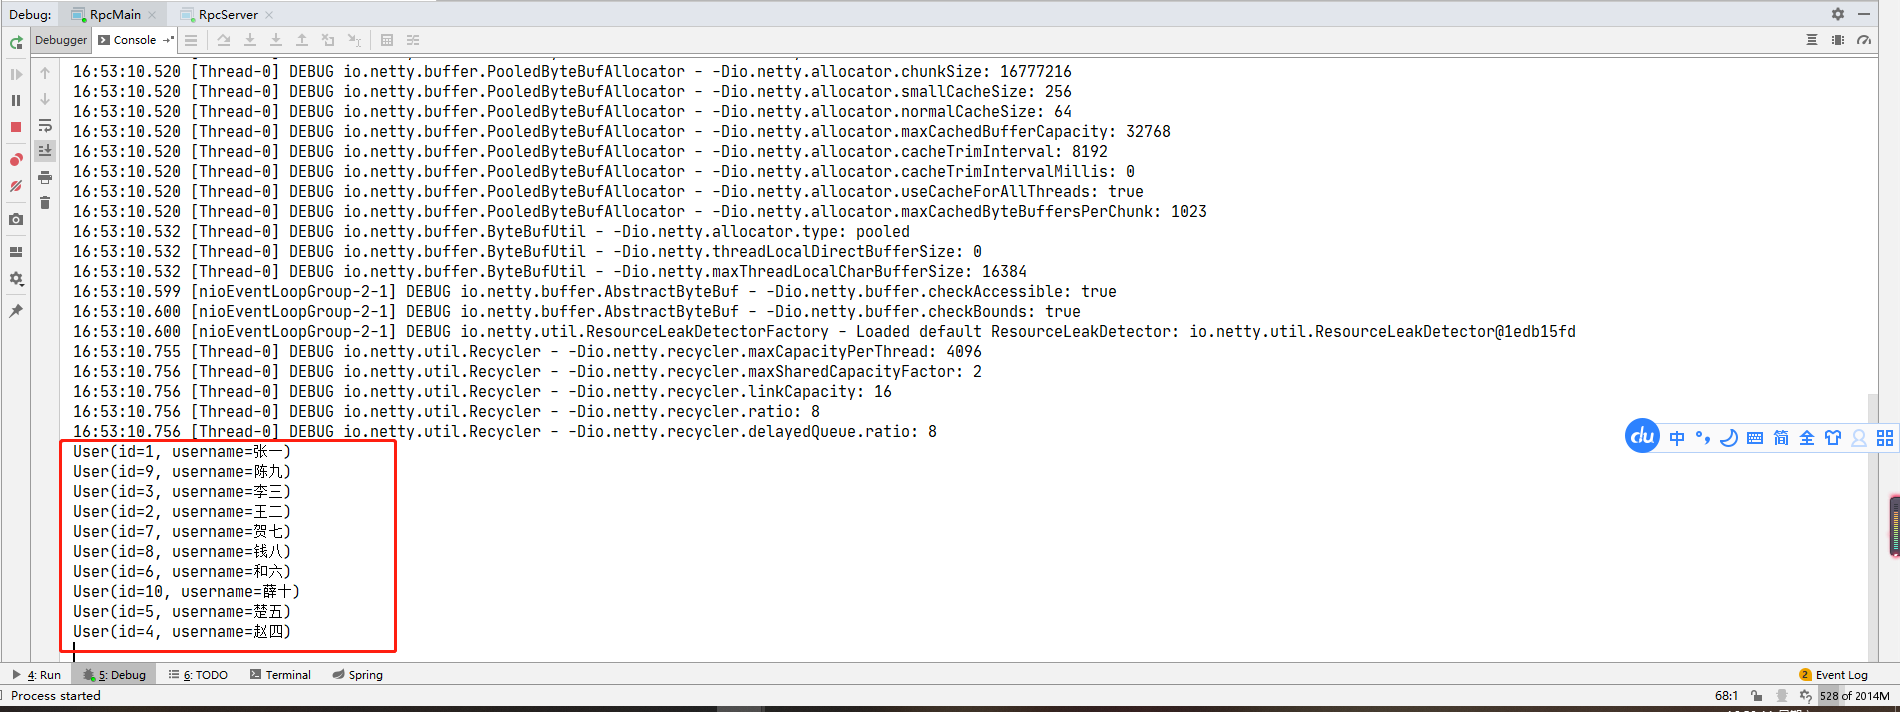
测试没有问题。至此我们本篇博文也就结束了,欢迎留言交流~~

文章评论