分布式配置中心的应用场景
在我们的微服务架构中,我们每个微服务实例都有自己的配置文件,但是如果我们想要修改配置文件中的公用属性的话,一个个修改配置文件并重启的方案肯定是十分不友好的。所以,分布式配置中心应用而生。分布式配置中心可以解决不同的环境做配置隔离、自动管理所有服务实例的配置并且可以做到一次修改,到处生效。
SpringCloud Config
Config简介
SpringCloud Config是一个分布式配置管理方案,包含了Server端和Client端两个部分。其工作流程如下图所示:

- Server端:提供配置文件的存储、一借口形式将配置文件的内容提供出去,通过使用
@EnableConfigServer注解在SpringBoot应用中非常简单的嵌入 - Client端:通过接口获取配置数据并初始化自己的应用
Config分布式配置应用
创建配置仓库
Config Server是集中式的配置服务,用于集中管理应用程序各个环境下的配置。默认使用Git存储配置文件的内容,也可以使用SVN。
比如我们要对之前的网关服务改造成在配置中心拉取配置。我们首先需要登录码云(也可以是Github或者私服的Gitlab),创建一个名字为scn-config-repo的项目,并创建文件夹gateway。在gateway文件夹下面上传网关的配置文件,配置文件命名规则为:{application}-{profile}.yml 或者 {application}-{profile}.properties,application为应用名称,profile指的是环境(用于区分开发环境,测试环境、⽣产环境等)。我们上传文件名为gateway-eureka.yml的配置文件,文件内容如下:
server:
  port: 9200
spring:
  application:
    name: gateway
  cloud:
    gateway:
      routes:
        - id: service-resume-router
          uri: lb://scn-service-resume
          predicates:
            - Path=/api-resume/**
          filters:
            - StripPrefix=1
        - id: service-auto-deliver-router
          uri: lb://scn-service-auto-deliver
          predicates:
            - Path=/api-auto-deliver/**
            # 详情参考:https://docs.spring.io/spring-cloud-gateway/docs/2.2.10.BUILD-SNAPSHOT/reference/html/#configuring-route-predicate-factories-and-gateway-filter-factories
            # 时间点后匹配
            # - After=2017-01-20T17:42:47.789-07:00[America/Denver]
            # 时间点前匹配
            # - Before=2017-01-20T17:42:47.789-07:00[America/Denver]
            # 时间区间匹配
            # - Between=2017-01-20T17:42:47.789-07:00[America/Denver],2017-01-21T17:42:47.789-07:00[America/Denver]
            # 指定Cookie正则匹配指定值
            # - Cookie=chocolate, ch.p
            # 指定Header正则匹配指定值
            # - Header=X-Request-Id, \d+
            # 请求Host匹配指定值
            # - Host=**.somehost.org,**.anotherhost.org
            # 请求Method匹配指定请求⽅式
            # - Method=GET,POST
            # 请求路径正则匹配
            # - Path=/red/{segment},/blue/{segment}
            # 请求包含某参数
            # - Query=green
            # 请求包含某参数并且参数值匹配正则表达式
            # - Query=red, gree.
            # 远程地址匹配
            # - RemoteAddr=192.168.1.1/24
          filters:
            - StripPrefix=1 # 可以去掉api-auto-deliver之后转发 数字代表去掉几层
            - RequestTime=true
eureka:
  instance:
    hostname: 127.0.0.1
    prefer-ip-address: true
    # 配置中心读取的配置不能解析@。。@来标注的pom文件中的变量,只能写死或者配置在该配置文件中用${}的形式引用
    instance-id: ${spring.cloud.client.ip-address}:${spring.application.name}:${server.port}:1.0-SNAPSHOT
    # 租约续约间隔时间,默认30秒
    lease-renewal-interval-in-seconds: 30
    # 租约到期,服务时效时间,默认值90秒,服务超过90秒没有发生⼼跳,EurekaServer会将服务从列表移除
    lease-expiration-duration-in-seconds: 90
  client:
    service-url:
      defaultZone: http://eureka-host:8761/eureka/,http://eureka-host:8762/eureka/
    register-with-eureka: true
    # 每隔多久拉取一次服务列表
    registry-fetch-interval-seconds: 30
    fetch-registry: true
    # 配制了该项 回阻止将该实例注册为一个eureka client 默认是true 默认自动加入一个Maker类标记  所以引入eureka-client依赖之后 加不加@EnableEurekaClient都会默认注册进EurekaServer
    # enabled: false

# springboot中暴露健康检查等断点接⼝
management:
  endpoints:
    web:
      exposure:
        include: "*"
  # 暴露健康接口的细节
  endpoint:
    health:
      show-details: always
创建Config Server服务
我们下面的配置中心服务端模块的定义是在博文SpringCloud Netflix之Eureka Server中搭建的大框架下创建的,有需要的可以参考该博文的大框架的搭建。
我们在spring-cloud-demo模块下创建子模块config-server,其pom文件如下:
<?xml version="1.0" encoding="UTF-8"?>
<project xmlns="http://maven.apache.org/POM/4.0.0"
         xmlns:xsi="http://www.w3.org/2001/XMLSchema-instance"
         xsi:schemaLocation="http://maven.apache.org/POM/4.0.0 http://maven.apache.org/xsd/maven-4.0.0.xsd">
    <parent>
        <artifactId>spring-cloud-demo</artifactId>
        <groupId>com.rubin</groupId>
        <version>1.0-SNAPSHOT</version>
    </parent>
    <modelVersion>4.0.0</modelVersion>

    <artifactId>config-server</artifactId>

    <dependencies>
        <dependency>
            <groupId>org.springframework.cloud</groupId>
            <artifactId>spring-cloud-starter-netflix-eureka-client</artifactId>
        </dependency>
        <dependency>
            <groupId>org.springframework.cloud</groupId>
            <artifactId>spring-cloud-config-server</artifactId>
        </dependency>
    </dependencies>

</project>
启动类如下:
package com.rubin.scn.config.server;

import org.springframework.boot.SpringApplication;
import org.springframework.boot.autoconfigure.SpringBootApplication;
import org.springframework.cloud.client.discovery.EnableDiscoveryClient;
import org.springframework.cloud.config.server.EnableConfigServer;

@SpringBootApplication
@EnableDiscoveryClient
@EnableConfigServer
public class ConfigServerBootstrap {

    public static void main(String[] args) {
        SpringApplication.run(ConfigServerBootstrap.class, args);
    }

}
创建配置文件如下:
server:
  port: 9400
spring:
  application:
    name: config-server
  cloud:
    config:
      server:
        git:
          uri: https://gitee.com/XXX/scn-config-repo.git
          username: username
          password: password
          search-paths: '{application}'
      label: master

eureka:
  instance:
    hostname: 127.0.0.1
    prefer-ip-address: true
    instance-id: ${spring.cloud.client.ip-address}:${spring.application.name}:${server.port}:@project.version@
    # 租约续约间隔时间,默认30秒
    lease-renewal-interval-in-seconds: 30
    # 租约到期,服务时效时间,默认值90秒,服务超过90秒没有发生⼼跳,EurekaServer会将服务从列表移除
    lease-expiration-duration-in-seconds: 90
  client:
    service-url:
      defaultZone: http://eureka-host:8761/eureka/,http://eureka-host:8762/eureka/
    register-with-eureka: true
    # 每隔多久拉取一次服务列表
    registry-fetch-interval-seconds: 30
    fetch-registry: true
    # 配制了该项 回阻止将该实例注册为一个eureka client 默认是true 默认自动加入一个Maker类标记  所以引入eureka-client依赖之后 加不加@EnableEurekaClient都会默认注册进EurekaServer
    # enabled: false

# springboot中暴露健康检查等断点接口
management:
  endpoints:
    web:
      exposure:
        include: "*"
  # 暴露健康接口的细节
  endpoint:
    health:
show-details: always启动服务,我们通过访问http://127.0.0.1:9400/master/gateway-eureka.yml来测试是不是可以读取到仓库的配置文件。
改造网关服务
我们的 网关 服务需要改造成通过配置服务器去读取配置,所以我们要添加如下依赖:
<dependency>
     <groupId>org.springframework.cloud</groupId>
     <artifactId>spring-cloud-config-client</artifactId>
</dependency>
添加完之后,删除原来的配置文件。创建两个配置文件:bootstrap.yml和bootstrap-eureka.yml(这个比较重要,一定要创建 bootstrap 前缀的配置文件,因为这个文件的优先级最高,且加载顺序最靠前,这样就保证了服务后续数据库连接等等组件可以使用读取到的配置)。内容如下:
bootstrap.yml :
spring:
  profiles:
    active: eureka
bootstrap-eureka.yml :
spring:
  cloud:
    config:
      name: gateway
      profile: eureka
      label: master
      uri: http://config-server-host:9400
修改完之后,我们启动网关服务来验证一下配置读取情况即可。我们可以根据此方法改造其他的微服务实例。
Config配置手动刷新
当我们修改了Git上配置文件的内容时,服务端(Config Server)能实时获取到最新的值,但是客户端(Config Client)读的是缓存,无法实时获取最新的值。SpringCloud已经为我们解决了这个问题,那就是客户端使用post去触发refresh,获取最新的数据。触发条件如下:
- Client客户端添加依赖springboot-starter-actuator(已添加)
- Client客户端配置暴露refresh通信端点(已配置为暴露所有端点)
management:
  endpoints:
    web:
      exposure:
        include: refresh

也可以暴露所有的端口
management:
  endpoints:
    web:
      exposure:
include: "*"- Client客户端使用到配置信息的类上要加上
@RefreshScope注解 - 手动向Client客户端发起POST请求:http://127.0.0.1:9200/actuator/refresh来刷新配置信息
这种方式虽然可以做到刷新客户端配置,但是我们不可避免的是要每个微服务都要发送刷新请求。如果微服务实例比较多的话,这个就是个灾难了。那我们能不能做到使用广播机制,我们就通知一次而刷新所有微服务的配置呢?答案是可以的。我们下一小节来讲解一下。
Config配置自动更新
在微服务架构中,我们可以结合消息总线(Bus)实现分布式配置的自动更新(Spring Cloud Config+Spring Cloud Bus)
消息总线Bus
所谓的消息总线Bus,就是我们经常会使用MQ消息代理构建一个公用的Topic,通过这个Topic连接各个微服务的实例,MQ广播的消息会被所有在注册中心的微服务实例监听和消费。换言之就是通过一个主题连接各个微服务,打通脉络。
Spring Cloud Bus(基于MQ的,⽀持RabbitMq/Kafka) 是Spring Cloud中的消息总线方案,Spring Cloud Config + Spring Cloud Bus 结合可以实现配置信息的自动更新。
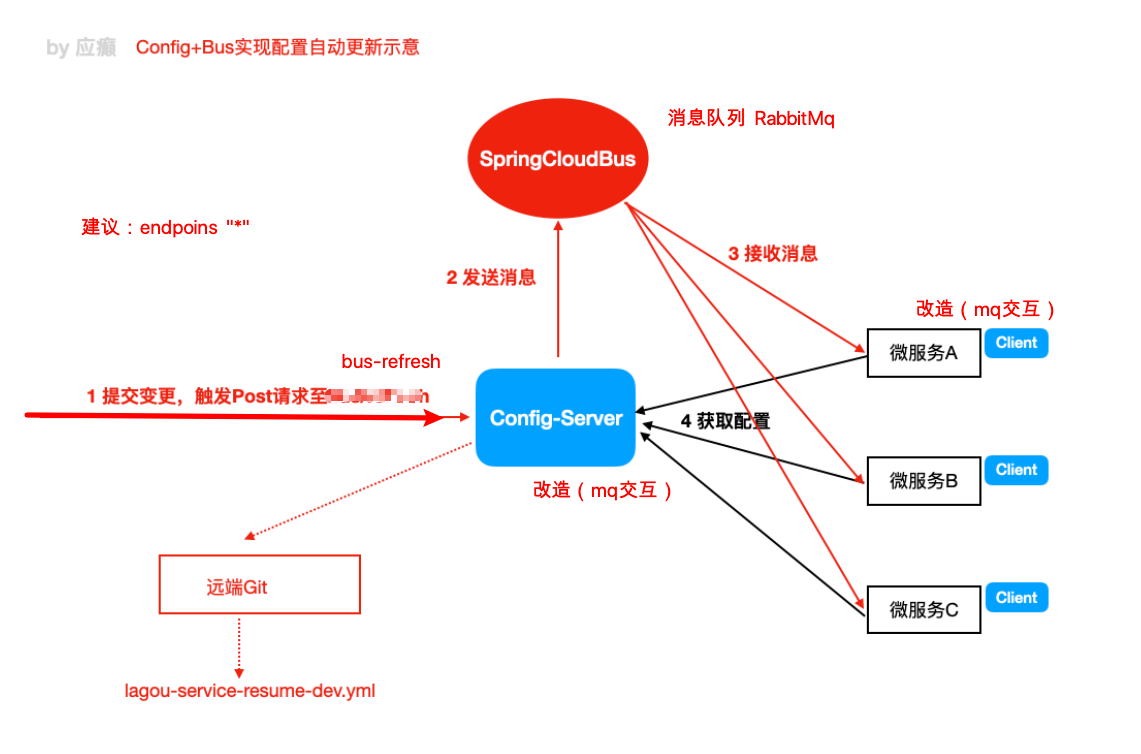
Spring Cloud Config+Spring Cloud Bus 实现自动刷新
MQ消息代理我们选择RabbitMQ,Config Server和Config Client都要添加消息总线的支持以及配置RabbitMQ的连接信息。
Config Server和Config Client 添加消息总线的支持:
<dependency>
    <groupId>org.springframework.cloud</groupId>
    <artifactId>spring-cloud-starter-bus-amqp</artifactId>
</dependency>
Config Server和Config Client 添加配置项:
spring:
  rabbitmq:
    host: 127.0.0.1
    port: 5672
    username: guest
    password: guest
Config Server和Config Client 暴露端口:
management:
  endpoints:
    web:
      exposure:
        include: bus-refresh
建议暴露所有的端⼝
management:
  endpoints:
    web:
      exposure:
include: "*"重启各个服务,更改配置后,向配置中心服务端发送post请求:http://127.0.0.1:9400/actuator/bus-refresh,各个客户端即可自动刷新配置。
那我们可不可以定向更新呢?是可以的。定向更新在后面加上服务明:端口号就可以实现定向刷新,例如:http://127.0.0.1:9400/actuator/bus-refresh/gateway:9200
以上就是关于分布式配置中心的所有内容。欢迎小伙伴们积极留言交流~~~

文章评论