微服务架构下统一认证思路
- 基于Session的认证方式:在分布式的环境下,基于session的认证会出现一个问题,每个应用服务都需要在session中存储用户身份信息,通过负载均衡将本地的请求分配到另一个应用服务需要将session信息带过去,否则会重新认证。我们可以使用Session共享、Session黏贴等方案。Session方案也有缺点,比如基于cookie,移动端不能有效使用等
- 基于token的认证方式:基于token的认证方式,服务端不用存储认证数据,易维护扩展性强, 客户端可以把token 存在任意地方,并且可以实现web和app统一认证机制。其缺点也很明显,token由于自包含信息,因此一般数据量较大,而且每次请求都需要传递,因此比较占带宽。另外,token的签名验签操作也会给cpu带来额外的处理负担。
OAuth2开放授权协议/标准
OAuth2介绍
OAuth(开放授权)是一个开放协议/标准,允许用户授权第三方应用访问他们存储 在另外的服务提供者上的信息,而不需要将用户名和密码提供给第三方应用或分享他们数据的所有内容。
OAuth2是OAuth协议的延续版本,但不向后兼容OAuth1即完全废止了OAuth1。
OAuth2协议角色和流程
我们的网站要开发使用QQ登录这个功能的话,那么我们的网站是需要提前到QQ平台进行登记的(否则QQ凭什么陪着我们的网站玩授权登录这件事)。
- 我们的网站——登记——>QQ平台
- QQ 平台会颁发一些参数给我们的网站,后续上线进行授权登录的时候需要携带这些参数。参数一般有两个:client_id :客户端id(QQ最终相当于一个认证授权服务器,我们的网站就相当于一个客户端了,所以会给一个客户端id),相当于账号;secret:相当于密码
认证流程如下图所示:
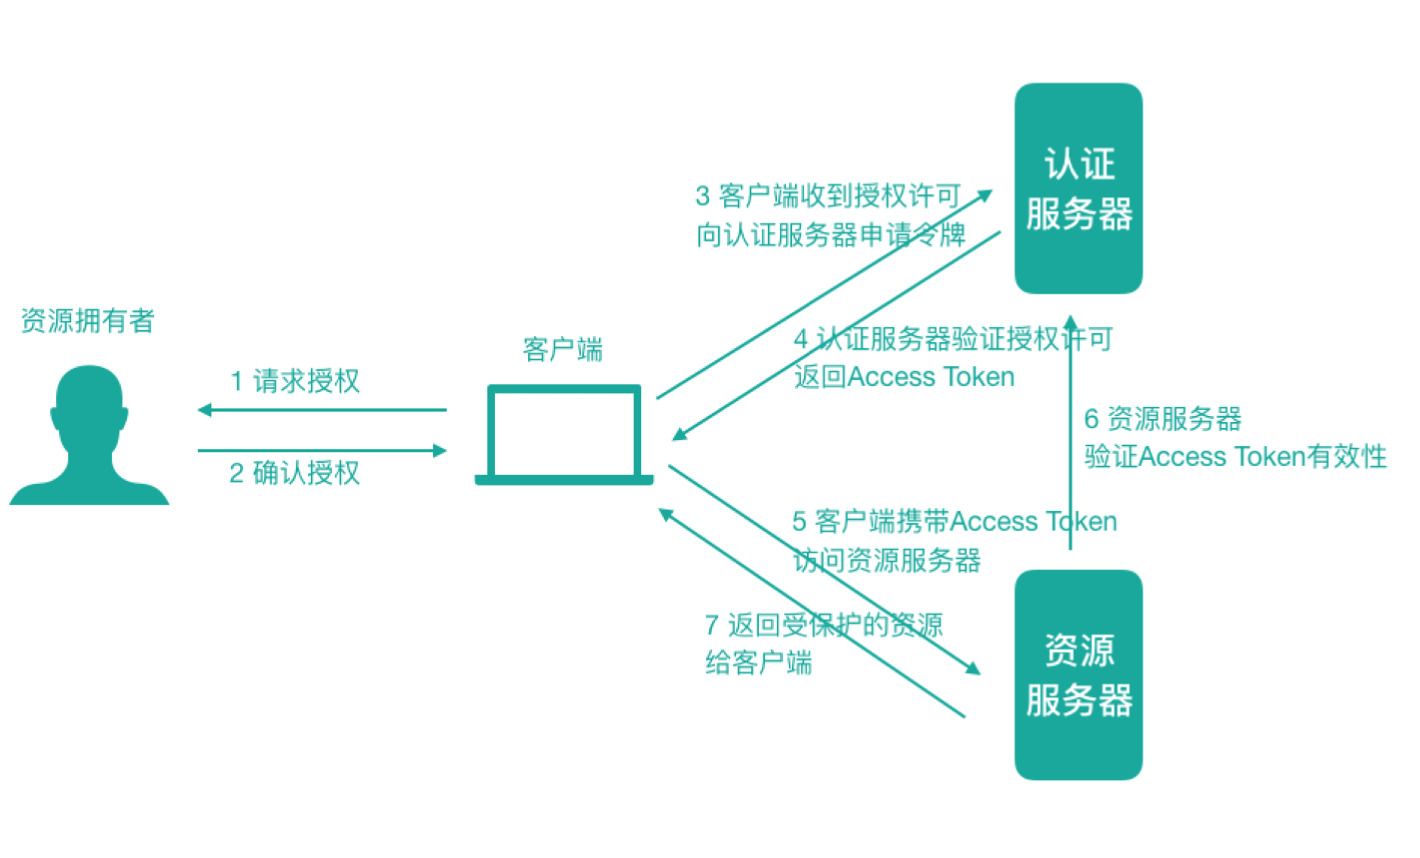
其中的角色如下:
- 资源所有者(Resource Owner):可以理解为用户自己
- 客户端(Client):我们想登陆的网站或应用,比如我们的网站
- 认证服务器(Authorization Server):可以理解为微信或者QQ
- 资源服务器(Resource Server):可以理解为微信或者QQ
什么情况下需要使用OAuth2
- 第三方授权登录的场景:比如,我们经常登录一些网站或者应用的时候,可以选择使用第三方授权登录的方式,比如:微信授权登录、QQ授权登录、微博授权登录等,这是典型的 OAuth2 使用场景
- 单点登录的场景:如果公司内有很多微服务,我们就可以专门做一个统一的认证中心来满足所有微服务的认证需求。即可以做到一次认证,处处生效
OAuth2的颁发Token授权方式
- 授权码(authorization-code)
- 密码式(password):提供用户名+密码换取token令牌
- 隐藏式(implicit)
- 客户端凭证(client credentials)
SpringCloud OAuth2 + JWT 实现
SpringCloud OAuth2介绍
SpringCloud OAuth2 是 SpringCloud 体系对OAuth2协议的实现,可以用来做多个微服务的统一认证(验证身份合法性)授权(验证权限)。通过向OAuth2服务 (统一认证授权服务)发送某个类型的grant_type进行集中认证和授权,从而获得 access_token(访问令牌),而这个token是受其他微服务信任的。
SpringCloud OAuth2构建微服务统一认证服务思路

在我们统一认证的场景中,Resource Server其实就是我们的各种受保护的微服务,微服务中的各种API访问接口就是资源,发起HTTP请求的浏览器就是Client 客户端(对应为第三方应用)。
搭建认证服务器(Authorization Server)
我们下面的认证服务器模块的定义是在博文SpringCloud Netflix之Eureka Server中搭建的大框架下创建的,有需要的可以参考该博文的大框架的搭建。
我们在spring-cloud-demo模块下面创建authorization-server子模块,其pom结构如下:
<?xml version="1.0" encoding="UTF-8"?>
<project xmlns="http://maven.apache.org/POM/4.0.0"
         xmlns:xsi="http://www.w3.org/2001/XMLSchema-instance"
         xsi:schemaLocation="http://maven.apache.org/POM/4.0.0 http://maven.apache.org/xsd/maven-4.0.0.xsd">
    <parent>
        <artifactId>spring-cloud-demo</artifactId>
        <groupId>com.rubin</groupId>
        <version>1.0-SNAPSHOT</version>
    </parent>
    <modelVersion>4.0.0</modelVersion>

    <artifactId>authorization-server</artifactId>

    <dependencies>
        <dependency>
            <groupId>org.springframework.cloud</groupId>
            <artifactId>spring-cloud-starter-netflix-eureka-client</artifactId>
        </dependency>
        <dependency>
            <groupId>org.springframework.boot</groupId>
            <artifactId>spring-boot-starter-web</artifactId>
        </dependency>
        <!--导⼊spring cloud oauth2依赖-->
        <dependency>
            <groupId>org.springframework.cloud</groupId>
            <artifactId>spring-cloud-starter-oauth2</artifactId>
            <exclusions>
                <exclusion>
                    <groupId>org.springframework.security.oauth.boot</groupId>
                    <artifactId>spring-security-oauth2-autoconfigure</artifactId>
                </exclusion>
            </exclusions>
        </dependency>
        <dependency>
            <groupId>org.springframework.security.oauth.boot</groupId>
            <artifactId>spring-security-oauth2-autoconfigure</artifactId>
            <version>2.1.11.RELEASE</version>
        </dependency>
        <dependency>
            <groupId>org.springframework.security.oauth</groupId>
            <artifactId>spring-security-oauth2</artifactId>
            <version>2.3.4.RELEASE</version>
        </dependency>
    </dependencies>

</project>
启动类如下:
package com.rubin.authorization.server;

import org.springframework.boot.SpringApplication;
import org.springframework.boot.autoconfigure.SpringBootApplication;
import org.springframework.cloud.client.discovery.EnableDiscoveryClient;

@SpringBootApplication
@EnableDiscoveryClient
public class AuthorizationServerBootstrap {

    public static void main(String[] args) {
        SpringApplication.run(AuthorizationServerBootstrap.class, args);
    }

}
配置文件如下:
server:
  port: 9600
spring:
  application:
    name: authorization-server

eureka:
  instance:
    hostname: 127.0.0.1
    prefer-ip-address: true
    instance-id: ${spring.cloud.client.ip-address}:${spring.application.name}:${server.port}:1.0-SNAPSHOT
    # 租约续约间隔时间,默认30秒
    lease-renewal-interval-in-seconds: 30
    # 租约到期,服务时效时间,默认值90秒,服务超过90秒没有发生⼼跳,EurekaServer会将服务从列表移除
    lease-expiration-duration-in-seconds: 90
  client:
    service-url:
      defaultZone: http://eureka-host:8761/eureka/,http://eureka-host:8762/eureka/
    register-with-eureka: true
    # 每隔多久拉取一次服务列表
    registry-fetch-interval-seconds: 30
    fetch-registry: true
    # 配制了该项 回阻止将该实例注册为一个eureka client 默认是true 默认自动加入一个Maker类标记  所以引入eureka-client依赖之后 加不加@EnableEurekaClient都会默认注册进EurekaServer
    # enabled: false
新建我们的认证服务器配置类如下:
package com.rubin.authorization.server.config;

import org.springframework.beans.factory.annotation.Autowired;
import org.springframework.boot.SpringBootConfiguration;
import org.springframework.context.annotation.Bean;
import org.springframework.http.HttpMethod;
import org.springframework.security.authentication.AuthenticationManager;
import org.springframework.security.oauth2.config.annotation.configurers.ClientDetailsServiceConfigurer;
import org.springframework.security.oauth2.config.annotation.web.configuration.AuthorizationServerConfigurerAdapter;
import org.springframework.security.oauth2.config.annotation.web.configuration.EnableAuthorizationServer;
import org.springframework.security.oauth2.config.annotation.web.configurers.AuthorizationServerEndpointsConfigurer;
import org.springframework.security.oauth2.config.annotation.web.configurers.AuthorizationServerSecurityConfigurer;
import org.springframework.security.oauth2.provider.token.AuthorizationServerTokenServices;
import org.springframework.security.oauth2.provider.token.DefaultTokenServices;
import org.springframework.security.oauth2.provider.token.TokenStore;

@SpringBootConfiguration
@EnableAuthorizationServer
public class AuthorizationServerConfig extends AuthorizationServerConfigurerAdapter {

    @Autowired
    private AuthenticationManager authenticationManager;

    /**
     * 认证服务器最终是以api接口的方式对外提供服务(校验合法性并生成令牌、校验令牌等)
     * 那么,以api接口方式对外的话,就涉及到接口的访问权限,我们需要在这里进行必要的配置
     *
     * @param security
     * @throws Exception
     */
    @Override
    public void configure(AuthorizationServerSecurityConfigurer security) throws Exception {
        // 相当于打开endpoints访问接口的开关,这样的话后期我们能够访问该接口
        security
                // 允许客户端表单认证
                .allowFormAuthenticationForClients()
                // 开启端口/oauth/token_key的访问权限(允许)
                .tokenKeyAccess("permitAll()")
                // 开启端口/oauth/check_token的访问权限(允许)
                .checkTokenAccess("permitAll()");
    }

    /**
     * 客户端详情配置,
     * 比如client_id,secret
     *
     * @param clients
     * @throws Exception
     */
    @Override
    public void configure(ClientDetailsServiceConfigurer clients) throws Exception {
        // 客户端信息存储在什么地方,可以在内存中,可以在数据库中
        clients.inMemory()
                // 添加一个client配置,指定其client_id的密码/安全码
                .withClient("client_rubin")
                .secret("123456")
                // 指定客户端所能访问资源id清单,此处的资源id是需要在具体的资源服务器上也配置一样
                .resourceIds("scn-service-auto-deliver")
                // 认证类型/令牌颁发模式,可以配置多个在这里,但是不一定都用,具体使用哪种方式颁发token,需要客户端调用的时候传递参数指定
                .authorizedGrantTypes("password", "refresh_token")
                // 客户端的权限范围,此处配置为all全部即可
                .scopes("all");
    }

    /**
     * 认证服务器是玩转token的,那么这里配置token令牌管理相关(token此时就是一个字符串,当下的token需要在服务器端存储,那么存储在哪里呢?都是在这里配置)
     *
     * @param endpoints
     * @throws Exception
     */
    @Override
    public void configure(AuthorizationServerEndpointsConfigurer endpoints) throws Exception {
        endpoints
                // 指定token的存储方法
                .tokenStore(tokenStore())
                // token服务的一个描述,可以认为是token生成细节的描述,比如有效时间多少等
                .tokenServices(authorizationServerTokenServices())
                // 指定认证管理器,随后注⼊一个到当前类使用即可
                .authenticationManager(authenticationManager)
                .allowedTokenEndpointRequestMethods(HttpMethod.GET, HttpMethod.POST);
    }

    /**
     * 该方法用于创建TokenStore对象(令牌存储对象)
     * 也就是说token以什么形式存储
     *
     * @return
     */
    private TokenStore tokenStore() {
        return new InMemoryTokenStore();
    }

    /**
     * 该方法用于用户获取一个token服务对象(该对象描述了token有效期等信息)
     *
     * @return
     */
    private AuthorizationServerTokenServices authorizationServerTokenServices() {
        // 使用默认实现
        DefaultTokenServices defaultTokenServices = new DefaultTokenServices();
        // 是否开启令牌刷新
        defaultTokenServices.setSupportRefreshToken(true);
        defaultTokenServices.setTokenStore(tokenStore());

        // 设置令牌有效时间(一般设置为2个小时)
        defaultTokenServices.setAccessTokenValiditySeconds(60 * 60 * 2);
        // access_token就是我们请求资源需要携带的令牌
        // 设置刷新令牌的有效时间 3天
        defaultTokenServices.setRefreshTokenValiditySeconds(259200);
        return defaultTokenServices;
    }

}
关于三个configure方法:
- configure(ClientDetailsServiceConfigurer clients):用来配置客户端详情服务(ClientDetailsService),客户端详情信息在这里进行初始化,你能够把客户端详情信息写死在这里或者是通过数据库来存储调取详情信息
- configure(AuthorizationServerEndpointsConfigurer endpoints):用来配置令牌(token)的访问端点和令牌服务(token services)
- configure(AuthorizationServerSecurityConfigurer security):用来配置令牌端点的安全约束
关于 TokenStore:
- InMemoryTokenStore:默认采用,它可以完美的工作在单服务器上(即访问并发量压力不大的情况下,并且它在失败的时候不会进行备份),大多数的项目都可以使用这个版本的实现来进行 尝试,你可以在开发的时候使用它来进行管理,因为不会被保存到磁盘中,所以更易于调试
- JdbcTokenStore:这是一个基于JDBC的实现版本,令牌会被保存进关系型数据库。使用这个版本的实现时,你可以在不同的服务器之间共享令牌信息,使用这个版本的时候请注意把"spring-jdbc"这个依赖加入到你的 classpath 当中
- JwtTokenStore:这个版本的全称是 JSON Web Token(JWT),它可以把令牌相关的数据进行编码(因此对于后端服务来说,它不需要进行存储,这将是一个重大优势),缺点就是这个令牌占用的空间会比较大,如果你加入了比较多用户凭证信息,JwtTokenStore 不会保存任何数据
接下来我们开发认证服务器安全配置类,内容如下:
package com.rubin.authorization.server.config;

import org.springframework.beans.factory.annotation.Autowired;
import org.springframework.boot.SpringBootConfiguration;
import org.springframework.context.annotation.Bean;
import org.springframework.security.authentication.AuthenticationManager;
import org.springframework.security.config.annotation.authentication.builders.AuthenticationManagerBuilder;
import org.springframework.security.config.annotation.web.configuration.EnableWebSecurity;
import org.springframework.security.config.annotation.web.configuration.WebSecurityConfigurerAdapter;
import org.springframework.security.core.userdetails.User;
import org.springframework.security.core.userdetails.UserDetails;
import org.springframework.security.crypto.password.NoOpPasswordEncoder;
import org.springframework.security.crypto.password.PasswordEncoder;

import java.util.ArrayList;

@SpringBootConfiguration
@EnableWebSecurity
public class SecurityConfig extends WebSecurityConfigurerAdapter {

    @Autowired
    private PasswordEncoder passwordEncoder;

    /**
     * 密码编码对象(密码不进行加密处理)
     *
     * @return
     */
    @Bean
    public PasswordEncoder passwordEncoder() {
        return NoOpPasswordEncoder.getInstance();
    }

    /**
     * 处理用户名和密码验证事宜
     * 1)客户端传递username和password参数到认证服务器
     * 2)一般来说,username和password会存储在数据库中的用户表中
     * 3)根据用户表数据,验证当前传递过来的用户信息的合法性
     */
    @Override
    protected void configure(AuthenticationManagerBuilder auth) throws Exception {
        // 在这个方法中就可以去关联数据库了,当前我们先把用户信息配置在内存中
        // 实例化一个用户对象(相当于数据表中的一条用户记录)
        UserDetails user = new User("rubin", "123456", new ArrayList<>());
        auth.inMemoryAuthentication().withUser(user).passwordEncoder(passwordEncoder);
    }

    /**
     * 注册一个认证管理器对象到容器
     */
    @Bean
    @Override
    public AuthenticationManager authenticationManagerBean() throws Exception {
        return super.authenticationManagerBean();
    }

}
至此,我们的认证服务器就搭建完成了。
我们启动服务,访问http://127.0.0.1:9600/oauth/token?client_secret=123456&grant_type=password&client_id=client_rubin&username=rubin&password=123456,正常会返回token信息。
访问http://127.0.0.1:9600/oauth/check_token?token=a9979518-838c-49ff-b14a-ebdb7fde7d08来查看token是否过期。
改造资源服务器
我们通过改造服务消费者服务来使其成为资源服务器。我们在服务消费者服务的pom文件里面加入oauth2的依赖:
<?xml version="1.0" encoding="UTF-8"?>
<project xmlns="http://maven.apache.org/POM/4.0.0"
         xmlns:xsi="http://www.w3.org/2001/XMLSchema-instance"
         xsi:schemaLocation="http://maven.apache.org/POM/4.0.0 http://maven.apache.org/xsd/maven-4.0.0.xsd">
    <parent>
        <artifactId>scn</artifactId>
        <groupId>com.rubin</groupId>
        <version>1.0-SNAPSHOT</version>
    </parent>
    <modelVersion>4.0.0</modelVersion>

    <artifactId>scn-service-auto-deliver</artifactId>

    <dependencies>
        <dependency>
            <groupId>com.rubin</groupId>
            <artifactId>scn-service-common</artifactId>
            <version>1.0-SNAPSHOT</version>
        </dependency>
        <!--熔断器Hystrix-->
        <dependency>
            <groupId>org.springframework.cloud</groupId>
            <artifactId>spring-cloud-starter-netflix-hystrix</artifactId>
        </dependency>
        <dependency>
            <groupId>org.springframework.cloud</groupId>
            <artifactId>spring-cloud-starter-openfeign</artifactId>
        </dependency>
        <dependency>
            <groupId>org.springframework.cloud</groupId>
            <artifactId>spring-cloud-config-client</artifactId>
        </dependency>
        <dependency>
            <groupId>org.springframework.cloud</groupId>
            <artifactId>spring-cloud-starter-bus-amqp</artifactId>
        </dependency>
        <!--链路追踪-->
        <dependency>
            <groupId>org.springframework.cloud</groupId>
            <artifactId>spring-cloud-starter-sleuth</artifactId>
        </dependency>
        <dependency>
            <groupId>org.springframework.cloud</groupId>
            <artifactId>spring-cloud-starter-zipkin</artifactId>
        </dependency>
        <!--导入spring cloud oauth2依赖-->
        <dependency>
            <groupId>org.springframework.cloud</groupId>
            <artifactId>spring-cloud-starter-oauth2</artifactId>
            <exclusions>
                <exclusion>
                    <groupId>org.springframework.security.oauth.boot</groupId>
                    <artifactId>spring-security-oauth2-autoconfigure</artifactId>
                </exclusion>
            </exclusions>
        </dependency>
        <dependency>
            <groupId>org.springframework.security.oauth.boot</groupId>
            <artifactId>spring-security-oauth2-autoconfigure</artifactId>
            <version>2.1.11.RELEASE</version>
        </dependency>
        <!--引入security对oauth2的支持-->
        <dependency>
            <groupId>org.springframework.security.oauth</groupId>
            <artifactId>spring-security-oauth2</artifactId>
            <version>2.3.4.RELEASE</version>
        </dependency>
    </dependencies>

</project>
我们再来定义我们的资源服务配置类:
package com.rubin.scn.service.autodeliver.config;

import org.springframework.beans.factory.annotation.Autowired;
import org.springframework.boot.SpringBootConfiguration;
import org.springframework.security.config.annotation.web.builders.HttpSecurity;
import org.springframework.security.config.annotation.web.configuration.EnableWebSecurity;
import org.springframework.security.config.http.SessionCreationPolicy;
import org.springframework.security.jwt.crypto.sign.MacSigner;
import org.springframework.security.oauth2.config.annotation.web.configuration.EnableResourceServer;
import org.springframework.security.oauth2.config.annotation.web.configuration.ResourceServerConfigurerAdapter;
import org.springframework.security.oauth2.config.annotation.web.configurers.ResourceServerSecurityConfigurer;
import org.springframework.security.oauth2.provider.token.RemoteTokenServices;
import org.springframework.security.oauth2.provider.token.TokenStore;
import org.springframework.security.oauth2.provider.token.store.JwtAccessTokenConverter;
import org.springframework.security.oauth2.provider.token.store.JwtTokenStore;

@SpringBootConfiguration
@EnableResourceServer
@EnableWebSecurity
public class ResourceServerConfig extends ResourceServerConfigurerAdapter {

    @Autowired
    private RubinAccessTokenConvertor rubinAccessTokenConvertor;

    /**
     * 该方法用于定义资源服务器向远程认证服务器发起请求,进行token校验等事宜
     *
     * @param resources
     * @throws Exception
     */
    @Override
    public void configure(ResourceServerSecurityConfigurer resources) throws Exception {
        // 设置当前资源服务的资源id
        resources.resourceId("scn-service-auto-deliver");
        // 定义token服务对象(token校验就应该靠token服务对象)
        RemoteTokenServices remoteTokenServices = new RemoteTokenServices();
        // 校验端点/接口设置
        remoteTokenServices.setCheckTokenEndpointUrl("http://127.0.0.1:9600/oauth/check_token");
        // 携带客户端id和客户端安全码
        remoteTokenServices.setClientId("client_rubin");
        remoteTokenServices.setClientSecret("123456");
        // 别忘了这一步
        resources.tokenServices(remoteTokenServices);
    }

    /**
     * 场景:一个服务中可能有很多资源(API接口)
     * 某一些API接口,需要先认证,才能访问
     * 某一些API接口,压根就不需要认证,本来就是对外开放的接口
     * 我们就需要对不同特点的接口区分对待(在当前configure方法中完成),设置是否需要经过认证
     *
     * @param http
     * @throws Exception
     */
    @Override
    public void configure(HttpSecurity http) throws Exception {
        http
                // 设置session的创建策略(根据需要创建即可)
                .sessionManagement().sessionCreationPolicy(SessionCreationPolicy.IF_REQUIRED)
                .and()
                .authorizeRequests()
                // /auto-deliver/service为前缀的请求需要认证
                .antMatchers("/auto-deliver/service/**").authenticated()
                // /auto-deliver/resume为前缀的请求需要认证
                .antMatchers("/auto-deliver/resume/**").authenticated()
                // /auto-deliver/resumes为前缀的请求需要认证
                .antMatchers("/auto-deliver/resumes").authenticated()
                // 其他请求不认证
                .anyRequest().permitAll();
    }

}
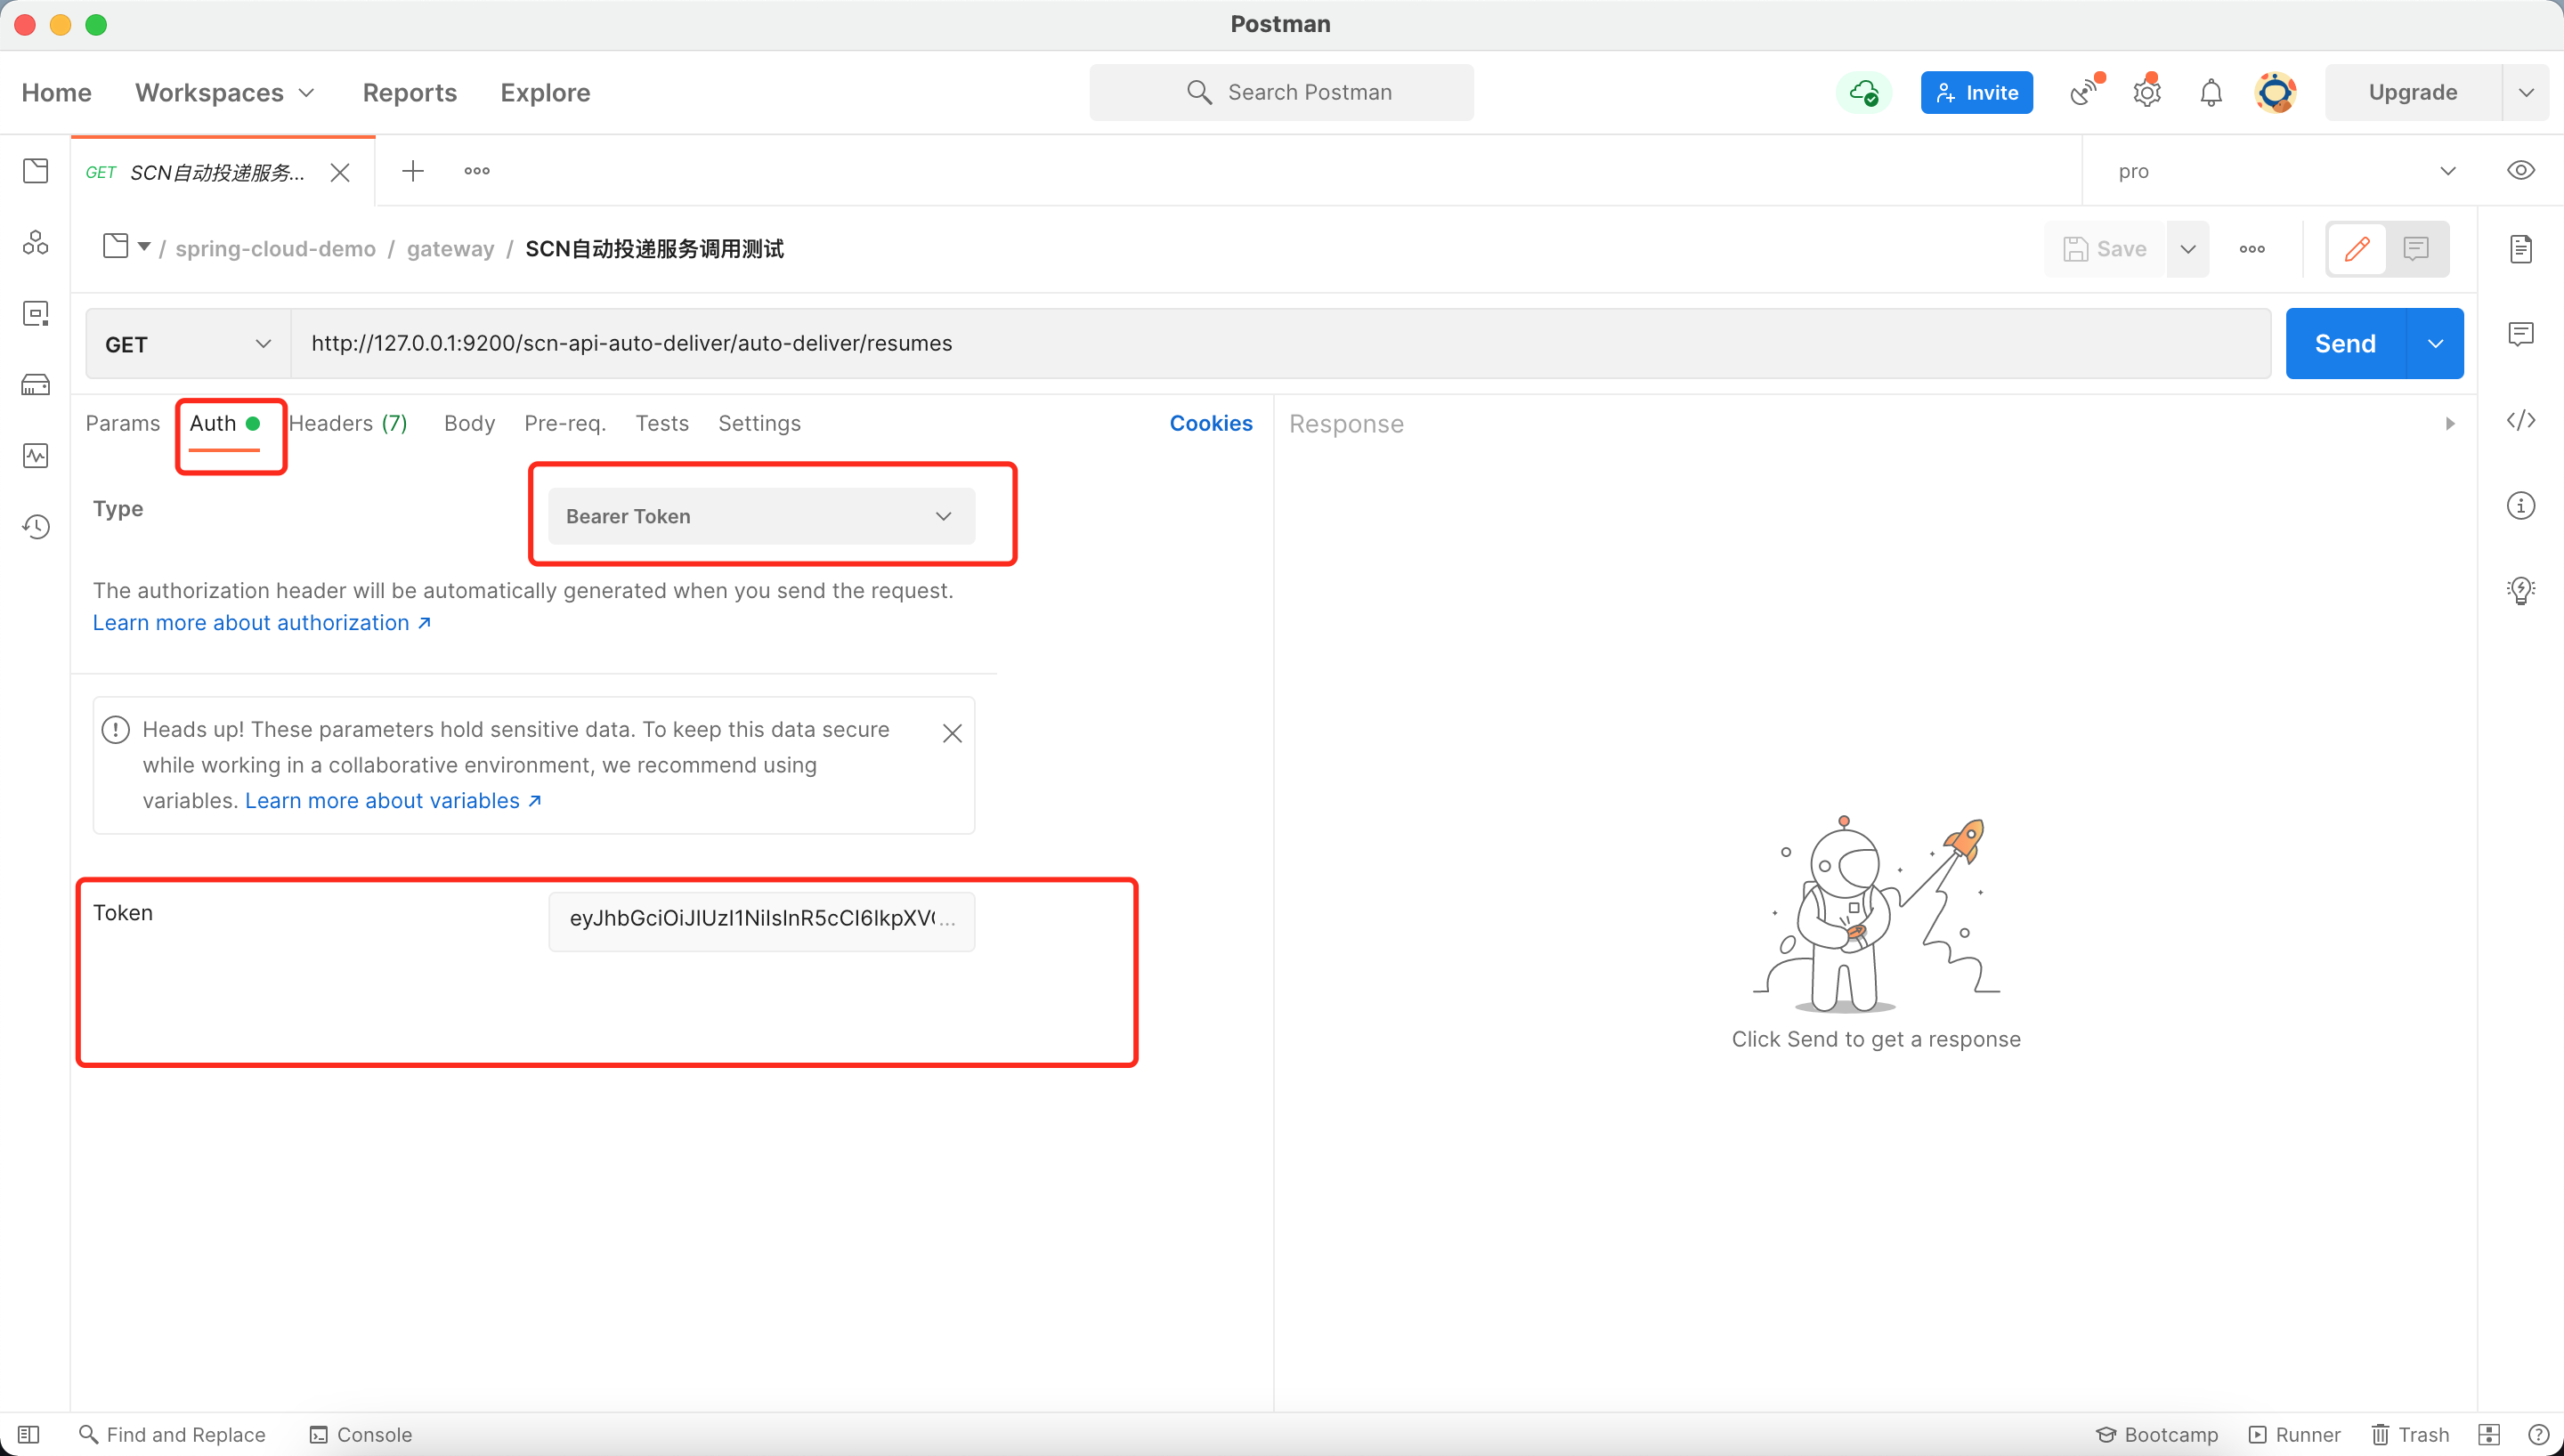
这样的话,我们重启服务。并启动网关服务。访问http://127.0.0.1:9200/scn-api-auto-deliver/auto-deliver/service/scn-service-auto-deliver会发现我们需要认证才能访问。这时我们从认证服务器那里获取了token,将其作为参数放在原调用链接的后面即可,例如:http://127.0.0.1:9200/scn-api-auto-deliver/auto-deliver/service/scn-service-auto-deliver?access_token=获取的token,或者通过postman的认证功能来测试:
思考:当我们第一次登陆之后,认证服务器颁发token并将其存储在认证服务器中,后期我们访问资源服务器时会携带token,资源服务器会请求认证 服务器验证token有效性,如果资源服务器有很多,那么认证服务器压力会 很大.......
另外,资源服务器向认证服务器check_token,获取的也是用户信息 UserInfo,能否把用户信息存储到令牌中,让客户端一直持有这个令牌,令牌的验证也在资源服务器进行,这样避免和认证服务器频繁的交互......
所以,我们可以考虑使用 JWT 进行改造,使用JWT机制之后资源服务器不需要访问认证服务器。
JWT改造统一认证授权中心的令牌存储机制
什么是JWT
JSON Web Token(JWT)是一个开放的行业标准(RFC 7519),它定义了一种简洁的、自包含的协议格式,用于在通信双方传递json对象,传递的信息经过数字签名可以被验证和信任。JWT可以使用HMAC算法或使用RSA的公钥/私钥对来签名,防止被篡改。
JWT令牌结构
JWT令牌由三部分组成,每部分中间使用点(.)分隔,比如:xxxxx.yyyyy.zzzzz。
- Header:头部包括令牌的类型(即JWT)及使用的哈希算法(如HMAC SHA256或 RSA),例如
{
    "alg": "HS256",
    "typ": "JWT"
}
将上边的内容使用Base64Url编码,得到一个字符串就是JWT令牌的第一部分
- Payload:第二部分是负载,内容也是一个json对象,它是存放有效信息的地方,它可以存放jwt提供的现成字段,比 如:iss(签发者),exp(过期时间戳), sub(面向的 用户)等,也可自定义字段。 此部分不建议存放敏感信息,因为此部分可以解码还原原始内容。 最后将第二部分负载使用Base64Url编码,得到一个字符串就是JWT令牌的第二部分。 一个例子:
{
    "sub": "1234567890",
    "name": "John Doe",
    "iat": 1516239022
}- Signature:第三部分是签名,此部分用于防止jwt内容被篡改。 这个部分使用base64url将前两部分进行编码,编码后使用点(.)连接组成字符串,最后使用header中声明签名算法进行签名。算法为
HMACSHA256(base64UrlEncode(header) + "." + base64UrlEncode(payload), secret)。其中base64UrlEncode(header)是JWT令牌的第一部分,base64UrlEncode(payload)是JWT令牌的第二部分,secret是签名所使用的密钥
接下来,我们就来改造一下认证服务器,使其支持JWT令牌。修改配置类如下:
package com.rubin.authorization.server.config;

import org.springframework.beans.factory.annotation.Autowired;
import org.springframework.boot.SpringBootConfiguration;
import org.springframework.context.annotation.Bean;
import org.springframework.http.HttpMethod;
import org.springframework.security.authentication.AuthenticationManager;
import org.springframework.security.jwt.crypto.sign.MacSigner;
import org.springframework.security.oauth2.config.annotation.configurers.ClientDetailsServiceConfigurer;
import org.springframework.security.oauth2.config.annotation.web.configuration.AuthorizationServerConfigurerAdapter;
import org.springframework.security.oauth2.config.annotation.web.configuration.EnableAuthorizationServer;
import org.springframework.security.oauth2.config.annotation.web.configurers.AuthorizationServerEndpointsConfigurer;
import org.springframework.security.oauth2.config.annotation.web.configurers.AuthorizationServerSecurityConfigurer;
import org.springframework.security.oauth2.provider.client.JdbcClientDetailsService;
import org.springframework.security.oauth2.provider.token.AuthorizationServerTokenServices;
import org.springframework.security.oauth2.provider.token.DefaultTokenServices;
import org.springframework.security.oauth2.provider.token.TokenStore;
import org.springframework.security.oauth2.provider.token.store.JwtAccessTokenConverter;
import org.springframework.security.oauth2.provider.token.store.JwtTokenStore;

@SpringBootConfiguration
@EnableAuthorizationServer
public class AuthorizationServerConfig extends AuthorizationServerConfigurerAdapter {

    @Autowired
    private AuthenticationManager authenticationManager;

    private static final String SIGN_KEY = "rubin_sign_key";

    /**
     * 认证服务器最终是以api接口的方式对外提供服务(校验合法性并生成令牌、校验令牌等)
     * 那么,以api接口方式对外的话,就涉及到接口的访问权限,我们需要在这里进行必要的配置
     *
     * @param security
     * @throws Exception
     */
    @Override
    public void configure(AuthorizationServerSecurityConfigurer security) throws Exception {
        // 相当于打开endpoints访问接口的开关,这样的话后期我们能够访问该接口
        security
                // 允许客户端表单认证
                .allowFormAuthenticationForClients()
                // 开启端口/oauth/token_key的访问权限(允许)
                .tokenKeyAccess("permitAll()")
                // 开启端口/oauth/check_token的访问权限(允许)
                .checkTokenAccess("permitAll()");
    }

    /**
     * 客户端详情配置,
     * 比如client_id,secret
     *
     * @param clients
     * @throws Exception
     */
    @Override
    public void configure(ClientDetailsServiceConfigurer clients) throws Exception {
        // 客户端信息存储在什么地方,可以在内存中,可以在数据库中
        clients.inMemory()
                // 添加一个client配置,指定其client_id的密码/安全码
                .withClient("client_rubin")
                .secret("123456")
                // 指定客户端所能访问资源id清单,此处的资源id是需要在具体的资源服务器上也配置一样
                .resourceIds("scn-service-auto-deliver")
                // 认证类型/令牌颁发模式,可以配置多个在这里,但是不一定都用,具体使用哪种方式颁发token,需要客户端调用的时候传递参数指定
                .authorizedGrantTypes("password", "refresh_token")
                // 客户端的权限范围,此处配置为all全部即可
                .scopes("all");
    }

    /**
     * 认证服务器是玩转token的,那么这里配置token令牌管理相关(token此时就是一个字符串,当下的token需要在服务器端存储,那么存储在哪里呢?都是在这里配置)
     *
     * @param endpoints
     * @throws Exception
     */
    @Override
    public void configure(AuthorizationServerEndpointsConfigurer endpoints) throws Exception {
        endpoints
                // 指定token的存储方法
                .tokenStore(tokenStore())
                // token服务的一个描述,可以认为是token生成细节的描述,比如有效时间多少等
                .tokenServices(authorizationServerTokenServices())
                // 指定认证管理器,随后注⼊一个到当前类使用即可
                .authenticationManager(authenticationManager)
                .allowedTokenEndpointRequestMethods(HttpMethod.GET, HttpMethod.POST);
    }

    /**
     * 该方法用于创建TokenStore对象(令牌存储对象)
     * 也就是说token以什么形式存储
     *
     * @return
     */
    private TokenStore tokenStore() {
        // return new InMemoryTokenStore();
        // 使用jwt令牌
        return new JwtTokenStore(jwtAccessTokenConverter());
    }

    /**
     * 返回jwt令牌转换器(帮助我们生成jwt令牌的)
     * 在这里,我们可以把签名密钥传递进去给转换器对象
     *
     * @return
     */
    private JwtAccessTokenConverter jwtAccessTokenConverter() {
        JwtAccessTokenConverter jwtAccessTokenConverter = new JwtAccessTokenConverter();
        // 签名密钥
        jwtAccessTokenConverter.setSigningKey(SIGN_KEY);
        // 验证时使用的密钥,和签名密钥保持一致
        jwtAccessTokenConverter.setVerifier(new MacSigner(SIGN_KEY));
        return jwtAccessTokenConverter;
    }

    /**
     * 该方法用于用户获取一个token服务对象(该对象描述了token有效期等信息)
     *
     * @return
     */
    private AuthorizationServerTokenServices authorizationServerTokenServices() {
        // 使用默认实现
        DefaultTokenServices defaultTokenServices = new DefaultTokenServices();
        // 是否开启令牌刷新
        defaultTokenServices.setSupportRefreshToken(true);
        defaultTokenServices.setTokenStore(tokenStore());

        // 针对jwt令牌的添加
        defaultTokenServices.setTokenEnhancer(jwtAccessTokenConverter());

        // 设置令牌有效时间(一般设置为2个小时)
        defaultTokenServices.setAccessTokenValiditySeconds(60 * 60 * 2);
        // access_token就是我们请求资源需要携带的令牌
        // 设置刷新令牌的有效时间 3天
        defaultTokenServices.setRefreshTokenValiditySeconds(259200);
        return defaultTokenServices;
    }

}
我们的资源服务器也不需要从认证服务器那里去校验token,而是自己解析校验:
package com.rubin.scn.service.autodeliver.config;

import org.springframework.beans.factory.annotation.Autowired;
import org.springframework.boot.SpringBootConfiguration;
import org.springframework.security.config.annotation.web.builders.HttpSecurity;
import org.springframework.security.config.annotation.web.configuration.EnableWebSecurity;
import org.springframework.security.config.http.SessionCreationPolicy;
import org.springframework.security.jwt.crypto.sign.MacSigner;
import org.springframework.security.oauth2.config.annotation.web.configuration.EnableResourceServer;
import org.springframework.security.oauth2.config.annotation.web.configuration.ResourceServerConfigurerAdapter;
import org.springframework.security.oauth2.config.annotation.web.configurers.ResourceServerSecurityConfigurer;
import org.springframework.security.oauth2.provider.token.TokenStore;
import org.springframework.security.oauth2.provider.token.store.JwtAccessTokenConverter;
import org.springframework.security.oauth2.provider.token.store.JwtTokenStore;

@SpringBootConfiguration
@EnableResourceServer
@EnableWebSecurity
public class ResourceServerConfig extends ResourceServerConfigurerAdapter {

    private static final String SIGN_KEY = "rubin_sign_key";

    /**
     * 该方法用于定义资源服务器向远程认证服务器发起请求,进行token校验等事宜
     *
     * @param resources
     * @throws Exception
     */
    @Override
    public void configure(ResourceServerSecurityConfigurer resources) throws Exception {
        // 设置当前资源服务的资源id
        // resources.resourceId("scn-service-auto-deliver");
        // 定义token服务对象(token校验就应该靠token服务对象)
        // RemoteTokenServices remoteTokenServices = new RemoteTokenServices();
        // 校验端点/接口设置
        // remoteTokenServices.setCheckTokenEndpointUrl("http://127.0.0.1:9600/oauth/check_token");
        // 携带客户端id和客户端安全码
        // remoteTokenServices.setClientId("client_rubin");
        // remoteTokenServices.setClientSecret("123456");
        // 别忘了这一步
        // resources.tokenServices(remoteTokenServices);

        // jwt令牌改造
        // 无状态设置
        resources.resourceId("scn-service-auto-deliver").tokenStore(tokenStore()).stateless(true);
    }

    /**
     * 场景:一个服务中可能有很多资源(API接口)
     * 某一些API接口,需要先认证,才能访问
     * 某一些API接口,压根就不需要认证,本来就是对外开放的接口
     * 我们就需要对不同特点的接口区分对待(在当前configure方法中完成),设置是否需要经过认证
     *
     * @param http
     * @throws Exception
     */
    @Override
    public void configure(HttpSecurity http) throws Exception {
        http
                // 设置session的创建策略(根据需要创建即可)
                .sessionManagement().sessionCreationPolicy(SessionCreationPolicy.IF_REQUIRED)
                .and()
                .authorizeRequests()
                // /auto-deliver/service为前缀的请求需要认证
                .antMatchers("/auto-deliver/service/**").authenticated()
                // /auto-deliver/resume为前缀的请求需要认证
                .antMatchers("/auto-deliver/resume/**").authenticated()
                // /auto-deliver/resumes为前缀的请求需要认证
                .antMatchers("/auto-deliver/resumes").authenticated()
                // 其他请求不认证
                .anyRequest().permitAll();
    }

    /**
     * 该方法用于创建TokenStore对象(令牌存储对象)
     * 也就是说token以什么形式存储
     *
     * @return
     */
    private TokenStore tokenStore() {
        // return new InMemoryTokenStore();
        // 使用jwt令牌
        return new JwtTokenStore(jwtAccessTokenConverter());
    }

    /**
     * 返回jwt令牌转换器(帮助我们生成jwt令牌的)
     * 在这里,我们可以把签名密钥传递进去给转换器对象
     *
     * @return
     */
    private JwtAccessTokenConverter jwtAccessTokenConverter() {
        JwtAccessTokenConverter jwtAccessTokenConverter = new JwtAccessTokenConverter();
        // 签名密钥
        jwtAccessTokenConverter.setSigningKey(SIGN_KEY);
        // 验证时使用的密钥,和签名密钥保持⼀致
        jwtAccessTokenConverter.setVerifier(new MacSigner(SIGN_KEY));
        return jwtAccessTokenConverter;
    }

}
从数据库加载Oauth2客户端信息
我们改造认证服务器,使其从数据库加载客户端信息来防止资源服务器扩展二硬编码资源服务器名称的问题。改造认证服务器的pom如下:
<?xml version="1.0" encoding="UTF-8"?>
<project xmlns="http://maven.apache.org/POM/4.0.0"
         xmlns:xsi="http://www.w3.org/2001/XMLSchema-instance"
         xsi:schemaLocation="http://maven.apache.org/POM/4.0.0 http://maven.apache.org/xsd/maven-4.0.0.xsd">
    <parent>
        <artifactId>spring-cloud-demo</artifactId>
        <groupId>com.rubin</groupId>
        <version>1.0-SNAPSHOT</version>
    </parent>
    <modelVersion>4.0.0</modelVersion>

    <artifactId>authorization-server</artifactId>

    <dependencies>
        <dependency>
            <groupId>org.springframework.cloud</groupId>
            <artifactId>spring-cloud-starter-netflix-eureka-client</artifactId>
        </dependency>
        <dependency>
            <groupId>org.springframework.boot</groupId>
            <artifactId>spring-boot-starter-web</artifactId>
        </dependency>
        <!--导⼊spring cloud oauth2依赖-->
        <dependency>
            <groupId>org.springframework.cloud</groupId>
            <artifactId>spring-cloud-starter-oauth2</artifactId>
            <exclusions>
                <exclusion>
                    <groupId>org.springframework.security.oauth.boot</groupId>
                    <artifactId>spring-security-oauth2-autoconfigure</artifactId>
                </exclusion>
            </exclusions>
        </dependency>
        <dependency>
            <groupId>org.springframework.security.oauth.boot</groupId>
            <artifactId>spring-security-oauth2-autoconfigure</artifactId>
            <version>2.1.11.RELEASE</version>
        </dependency>
        <dependency>
            <groupId>org.springframework.security.oauth</groupId>
            <artifactId>spring-security-oauth2</artifactId>
            <version>2.3.4.RELEASE</version>
        </dependency>
        <!--数据库支持-->
        <dependency>
            <groupId>mysql</groupId>
            <artifactId>mysql-connector-java</artifactId>
            <scope>runtime</scope>
        </dependency>
        <dependency>
            <groupId>org.springframework.boot</groupId>
            <artifactId>spring-boot-starter-data-jpa</artifactId>
        </dependency>
    </dependencies>

</project>
创建名称为authorization的数据库,导入如下SQL:
SET NAMES utf8mb4;

SET FOREIGN_KEY_CHECKS = 0;

DROP TABLE IF EXISTS `oauth_client_details`;

CREATE TABLE `oauth_client_details` (
                                        `client_id` VARCHAR ( 48 ) NOT NULL,
                                        `resource_ids` VARCHAR ( 256 ) DEFAULT NULL,
                                        `client_secret` VARCHAR ( 256 ) DEFAULT NULL,
                                        `scope` VARCHAR ( 256 ) DEFAULT NULL,
                                        `authorized_grant_types` VARCHAR ( 256 ) DEFAULT NULL,
                                        `web_server_redirect_uri` VARCHAR ( 256 ) DEFAULT NULL,
                                        `authorities` VARCHAR ( 256 ) DEFAULT NULL,
                                        `access_token_validity` INT ( 11 ) DEFAULT NULL,
                                        `refresh_token_validity` INT ( 11 ) DEFAULT NULL,
                                        `additional_information` VARCHAR ( 4096 ) DEFAULT NULL,
                                        `autoapprove` VARCHAR ( 256 ) DEFAULT NULL,
                                        PRIMARY KEY ( `client_id` )
) ENGINE = INNODB DEFAULT CHARSET=utf8mb4 COLLATE=utf8mb4_bin;


INSERT INTO `oauth_client_details` VALUES ( 'client_rubin', 'scn-service-auto-deliver', '123456', 'all', 'password,refresh_token', NULL, NULL, 7200, 259200, NULL, NULL );

SET FOREIGN_KEY_CHECKS = 1;
配置文件增加数据库配置:
server:
  port: 9600
spring:
  application:
    name: authorization-server
  datasource:
    driver-class-name: com.mysql.cj.jdbc.Driver
    url: jdbc:mysql://127.0.0.1:3306/authorization?characterEncoding=utf8&serverTimezone=Asia/Shanghai&useSSL=false&allowPublicKeyRetrieval=true
    username: root
    password: 123456
  jpa:
    hibernate:
      ddl-auto: validate
    show-sql: true

eureka:
  instance:
    hostname: 127.0.0.1
    prefer-ip-address: true
    instance-id: ${spring.cloud.client.ip-address}:${spring.application.name}:${server.port}:1.0-SNAPSHOT
    # 租约续约间隔时间,默认30秒
    lease-renewal-interval-in-seconds: 30
    # 租约到期,服务时效时间,默认值90秒,服务超过90秒没有发生⼼跳,EurekaServer会将服务从列表移除
    lease-expiration-duration-in-seconds: 90
  client:
    service-url:
      defaultZone: http://eureka-host:8761/eureka/,http://eureka-host:8762/eureka/
    register-with-eureka: true
    # 每隔多久拉取一次服务列表
    registry-fetch-interval-seconds: 30
    fetch-registry: true
    # 配制了该项 回阻止将该实例注册为一个eureka client 默认是true 默认自动加入一个Maker类标记  所以引入eureka-client依赖之后 加不加@EnableEurekaClient都会默认注册进EurekaServer
    # enabled: false
修改配置类如下:
package com.rubin.authorization.server.config;

import org.springframework.beans.factory.annotation.Autowired;
import org.springframework.boot.SpringBootConfiguration;
import org.springframework.context.annotation.Bean;
import org.springframework.http.HttpMethod;
import org.springframework.security.authentication.AuthenticationManager;
import org.springframework.security.jwt.crypto.sign.MacSigner;
import org.springframework.security.oauth2.config.annotation.configurers.ClientDetailsServiceConfigurer;
import org.springframework.security.oauth2.config.annotation.web.configuration.AuthorizationServerConfigurerAdapter;
import org.springframework.security.oauth2.config.annotation.web.configuration.EnableAuthorizationServer;
import org.springframework.security.oauth2.config.annotation.web.configurers.AuthorizationServerEndpointsConfigurer;
import org.springframework.security.oauth2.config.annotation.web.configurers.AuthorizationServerSecurityConfigurer;
import org.springframework.security.oauth2.provider.client.JdbcClientDetailsService;
import org.springframework.security.oauth2.provider.token.AuthorizationServerTokenServices;
import org.springframework.security.oauth2.provider.token.DefaultTokenServices;
import org.springframework.security.oauth2.provider.token.TokenStore;
import org.springframework.security.oauth2.provider.token.store.JwtAccessTokenConverter;
import org.springframework.security.oauth2.provider.token.store.JwtTokenStore;

import javax.sql.DataSource;

@SpringBootConfiguration
@EnableAuthorizationServer
public class AuthorizationServerConfig extends AuthorizationServerConfigurerAdapter {

    @Autowired
    private AuthenticationManager authenticationManager;

    @Autowired
    private DataSource dataSource;

    private static final String SIGN_KEY = "rubin_sign_key";

    /**
     * 认证服务器最终是以api接口的方式对外提供服务(校验合法性并生成令牌、校验令牌等)
     * 那么,以api接口方式对外的话,就涉及到接口的访问权限,我们需要在这里进行必要的配置
     *
     * @param security
     * @throws Exception
     */
    @Override
    public void configure(AuthorizationServerSecurityConfigurer security) throws Exception {
        // 相当于打开endpoints访问接口的开关,这样的话后期我们能够访问该接口
        security
                // 允许客户端表单认证
                .allowFormAuthenticationForClients()
                // 开启端口/oauth/token_key的访问权限(允许)
                .tokenKeyAccess("permitAll()")
                // 开启端口/oauth/check_token的访问权限(允许)
                .checkTokenAccess("permitAll()");
    }

    /**
     * 客户端详情配置,
     * 比如client_id,secret
     *
     * @param clients
     * @throws Exception
     */
    @Override
    public void configure(ClientDetailsServiceConfigurer clients) throws Exception {
        // 客户端信息存储在什么地方,可以在内存中,可以在数据库中
        // clients.inMemory()
                // 添加一个client配置,指定其client_id的密码/安全码
                // .withClient("client_rubin")
                // .secret("123456")
                // 指定客户端所能访问资源id清单,此处的资源id是需要在具体的资源服务器上也配置一样
                // .resourceIds("scn-service-auto-deliver")
                // 认证类型/令牌颁发模式,可以配置多个在这里,但是不一定都用,具体使用哪种方式颁发token,需要客户端调用的时候传递参数指定
                // .authorizedGrantTypes("password", "refresh_token")
                // 客户端的权限范围,此处配置为all全部即可
                // .scopes("all");
        // 从内存中加载客户端详情改为从数据库中加载客户端详情
        clients.withClientDetails(createJdbcClientDetailsService());
    }

    @Bean
    public JdbcClientDetailsService createJdbcClientDetailsService() {
        JdbcClientDetailsService jdbcClientDetailsService = new JdbcClientDetailsService(dataSource);
        return jdbcClientDetailsService;
    }

    /**
     * 认证服务器是玩转token的,那么这里配置token令牌管理相关(token此时就是一个字符串,当下的token需要在服务器端存储,那么存储在哪里呢?都是在这里配置)
     *
     * @param endpoints
     * @throws Exception
     */
    @Override
    public void configure(AuthorizationServerEndpointsConfigurer endpoints) throws Exception {
        endpoints
                // 指定token的存储方法
                .tokenStore(tokenStore())
                // token服务的一个描述,可以认为是token生成细节的描述,比如有效时间多少等
                .tokenServices(authorizationServerTokenServices())
                // 指定认证管理器,随后注⼊一个到当前类使用即可
                .authenticationManager(authenticationManager)
                .allowedTokenEndpointRequestMethods(HttpMethod.GET, HttpMethod.POST);
    }

    /**
     * 该方法用于创建TokenStore对象(令牌存储对象)
     * 也就是说token以什么形式存储
     *
     * @return
     */
    private TokenStore tokenStore() {
        // return new InMemoryTokenStore();
        // 使用jwt令牌
        return new JwtTokenStore(jwtAccessTokenConverter());
    }

    /**
     * 返回jwt令牌转换器(帮助我们生成jwt令牌的)
     * 在这里,我们可以把签名密钥传递进去给转换器对象
     *
     * @return
     */
    private JwtAccessTokenConverter jwtAccessTokenConverter() {
        JwtAccessTokenConverter jwtAccessTokenConverter = new JwtAccessTokenConverter();
        // 签名密钥
        jwtAccessTokenConverter.setSigningKey(SIGN_KEY);
        // 验证时使用的密钥,和签名密钥保持一致
        jwtAccessTokenConverter.setVerifier(new MacSigner(SIGN_KEY));
        return jwtAccessTokenConverter;
    }

    /**
     * 该方法用于用户获取一个token服务对象(该对象描述了token有效期等信息)
     *
     * @return
     */
    private AuthorizationServerTokenServices authorizationServerTokenServices() {
        // 使用默认实现
        DefaultTokenServices defaultTokenServices = new DefaultTokenServices();
        // 是否开启令牌刷新
        defaultTokenServices.setSupportRefreshToken(true);
        defaultTokenServices.setTokenStore(tokenStore());

        // 针对jwt令牌的添加
        defaultTokenServices.setTokenEnhancer(jwtAccessTokenConverter());

        // 设置令牌有效时间(一般设置为2个小时)
        defaultTokenServices.setAccessTokenValiditySeconds(60 * 60 * 2);
        // access_token就是我们请求资源需要携带的令牌
        // 设置刷新令牌的有效时间 3天
        defaultTokenServices.setRefreshTokenValiditySeconds(259200);
        return defaultTokenServices;
    }

}
从数据库验证用户合法性
创建用户表并导入初始化数据:
DROP TABLE IF EXISTS `users`;

CREATE TABLE `users` (
                         `id` bigint NOT NULL AUTO_INCREMENT,
                         `username` varchar(10) CHARACTER SET utf8 COLLATE utf8_general_ci DEFAULT NULL,
                         `password` varchar(100) CHARACTER SET utf8 COLLATE utf8_general_ci DEFAULT NULL,
                         PRIMARY KEY (`id`)
) ENGINE=InnoDB AUTO_INCREMENT=2 DEFAULT CHARSET=utf8mb4 COLLATE=utf8mb4_bin;

INSERT INTO `users` VALUES (1, 'rubin', '123456');

SET FOREIGN_KEY_CHECKS = 1;
编写实体类:
package com.rubin.authorization.server.entity;

import lombok.Data;

import javax.persistence.*;

@Data
@Entity
@Table(name = "users")
public class Users {

    @Id
    @GeneratedValue(strategy = GenerationType.IDENTITY)
    private Long id;

    private String username;

    private String password;

}
JPA接口类:
package com.rubin.authorization.server.repository;

import com.rubin.authorization.server.entity.Users;
import org.springframework.data.jpa.repository.JpaRepository;
import org.springframework.stereotype.Repository;

@Repository
public interface IUsersRepository extends JpaRepository<Users, Long> {

    Users findByUsername(String username);

}
Service类:
package com.rubin.authorization.server.service;

import com.rubin.authorization.server.entity.Users;
import com.rubin.authorization.server.repository.IUsersRepository;
import org.springframework.beans.factory.annotation.Autowired;
import org.springframework.security.core.userdetails.User;
import org.springframework.security.core.userdetails.UserDetails;
import org.springframework.security.core.userdetails.UserDetailsService;
import org.springframework.security.core.userdetails.UsernameNotFoundException;
import org.springframework.stereotype.Service;

import java.util.ArrayList;

@Service
public class JdbcUserDetailsService implements UserDetailsService {

    @Autowired
    private IUsersRepository iUsersRepository;

    @Override
    public UserDetails loadUserByUsername(String username) throws UsernameNotFoundException {
        Users users = iUsersRepository.findByUsername(username);
        return new User(users.getUsername(), users.getPassword(), new ArrayList<>());
    }

}
启动类:
package com.rubin.authorization.server;

import org.springframework.boot.SpringApplication;
import org.springframework.boot.autoconfigure.SpringBootApplication;
import org.springframework.boot.autoconfigure.domain.EntityScan;
import org.springframework.cloud.client.discovery.EnableDiscoveryClient;

@SpringBootApplication
@EnableDiscoveryClient
@EntityScan(basePackages = "com.rubin.authorization.server.entity")
public class AuthorizationServerBootstrap {

    public static void main(String[] args) {
        SpringApplication.run(AuthorizationServerBootstrap.class, args);
    }

}
修改Security配置类:
package com.rubin.authorization.server.config;

import com.rubin.authorization.server.service.JdbcUserDetailsService;
import org.springframework.beans.factory.annotation.Autowired;
import org.springframework.boot.SpringBootConfiguration;
import org.springframework.context.annotation.Bean;
import org.springframework.security.authentication.AuthenticationManager;
import org.springframework.security.config.annotation.authentication.builders.AuthenticationManagerBuilder;
import org.springframework.security.config.annotation.web.configuration.EnableWebSecurity;
import org.springframework.security.config.annotation.web.configuration.WebSecurityConfigurerAdapter;
import org.springframework.security.core.userdetails.User;
import org.springframework.security.core.userdetails.UserDetails;
import org.springframework.security.crypto.password.NoOpPasswordEncoder;
import org.springframework.security.crypto.password.PasswordEncoder;

import java.util.ArrayList;

@SpringBootConfiguration
@EnableWebSecurity
public class SecurityConfig extends WebSecurityConfigurerAdapter {

    @Autowired
    private PasswordEncoder passwordEncoder;

    @Autowired
    private JdbcUserDetailsService jdbcUserDetailsService;

    /**
     * 密码编码对象(密码不进行加密处理)
     *
     * @return
     */
    @Bean
    public PasswordEncoder passwordEncoder() {
        return NoOpPasswordEncoder.getInstance();
    }

    /**
     * 处理用户名和密码验证事宜
     * 1)客户端传递username和password参数到认证服务器
     * 2)一般来说,username和password会存储在数据库中的用户表中
     * 3)根据用户表数据,验证当前传递过来的用户信息的合法性
     */
    @Override
    protected void configure(AuthenticationManagerBuilder auth) throws Exception {
        // 在这个方法中就可以去关联数据库了,当前我们先把用户信息配置在内存中
        // 实例化一个用户对象(相当于数据表中的一条用户记录)
        // UserDetails user = new User("rubin", "123456", new ArrayList<>());
        // auth.inMemoryAuthentication().withUser(user).passwordEncoder(passwordEncoder);

        // 使用数据库用户信息验证用户用户名密码
        auth.userDetailsService(jdbcUserDetailsService).passwordEncoder(passwordEncoder);
    }

    /**
     * 注册一个认证管理器对象到容器
     */
    @Bean
    @Override
    public AuthenticationManager authenticationManagerBean() throws Exception {
        return super.authenticationManagerBean();
    }

}
基于Oauth2的JWT令牌信息扩展
OAuth2帮我们生成的JWT令牌载荷部分信息有限,关于用户信息只有一个user_name,有些场景下我们希望放入一些扩展信息项,比如,之前我们经常向 session中存入userId,或者现在我希望在JWT的载荷部分存入当时请求令牌的客户端IP,客户端携带令牌访问资源服务时,可以对比当前请求的客户端真实IP和令牌中存放的客户端IP是否匹配,不匹配拒绝请求,以此进一步提高安全性。那么如何在 OAuth2环境下向JWT令牌中存如扩展信息?
我们需要在认证服务器端添加自定义的AccessTokenConverter类,详情如下:
package com.rubin.authorization.server.config;

import org.springframework.security.oauth2.common.OAuth2AccessToken;
import org.springframework.security.oauth2.provider.OAuth2Authentication;
import org.springframework.security.oauth2.provider.token.DefaultAccessTokenConverter;
import org.springframework.stereotype.Component;
import org.springframework.web.context.request.RequestContextHolder;
import org.springframework.web.context.request.ServletRequestAttributes;

import javax.servlet.http.HttpServletRequest;
import java.util.Map;

@Component
public class RubinAccessTokenConvertor extends DefaultAccessTokenConverter {

    @Override
    public Map<String, ?> convertAccessToken(OAuth2AccessToken token, OAuth2Authentication authentication) {
        // 获取到request对象
        HttpServletRequest request = ((ServletRequestAttributes) (RequestContextHolder.getRequestAttributes())).getRequest();
        // 获取客户端ip(注意:如果是经过代理之后到达当前服务的话,那么这种方式获取的并不是真实的浏览器客户端ip)
        String remoteAddr = request.getRemoteAddr();
        Map<String, String> stringMap = (Map<String, String>) super.convertAccessToken(token, authentication);
        stringMap.put("clientIp", remoteAddr);
        return stringMap;
    }

}
将该对象应用到token生成过程:
package com.rubin.authorization.server.config;

import org.springframework.beans.factory.annotation.Autowired;
import org.springframework.boot.SpringBootConfiguration;
import org.springframework.context.annotation.Bean;
import org.springframework.http.HttpMethod;
import org.springframework.security.authentication.AuthenticationManager;
import org.springframework.security.jwt.crypto.sign.MacSigner;
import org.springframework.security.oauth2.config.annotation.configurers.ClientDetailsServiceConfigurer;
import org.springframework.security.oauth2.config.annotation.web.configuration.AuthorizationServerConfigurerAdapter;
import org.springframework.security.oauth2.config.annotation.web.configuration.EnableAuthorizationServer;
import org.springframework.security.oauth2.config.annotation.web.configurers.AuthorizationServerEndpointsConfigurer;
import org.springframework.security.oauth2.config.annotation.web.configurers.AuthorizationServerSecurityConfigurer;
import org.springframework.security.oauth2.provider.client.JdbcClientDetailsService;
import org.springframework.security.oauth2.provider.token.AuthorizationServerTokenServices;
import org.springframework.security.oauth2.provider.token.DefaultTokenServices;
import org.springframework.security.oauth2.provider.token.TokenStore;
import org.springframework.security.oauth2.provider.token.store.JwtAccessTokenConverter;
import org.springframework.security.oauth2.provider.token.store.JwtTokenStore;

import javax.sql.DataSource;

@SpringBootConfiguration
@EnableAuthorizationServer
public class AuthorizationServerConfig extends AuthorizationServerConfigurerAdapter {

    @Autowired
    private AuthenticationManager authenticationManager;

    @Autowired
    private DataSource dataSource;

    @Autowired
    private RubinAccessTokenConvertor rubinAccessTokenConvertor;

    private static final String SIGN_KEY = "rubin_sign_key";

    /**
     * 认证服务器最终是以api接口的方式对外提供服务(校验合法性并生成令牌、校验令牌等)
     * 那么,以api接口方式对外的话,就涉及到接口的访问权限,我们需要在这里进行必要的配置
     *
     * @param security
     * @throws Exception
     */
    @Override
    public void configure(AuthorizationServerSecurityConfigurer security) throws Exception {
        // 相当于打开endpoints访问接口的开关,这样的话后期我们能够访问该接口
        security
                // 允许客户端表单认证
                .allowFormAuthenticationForClients()
                // 开启端口/oauth/token_key的访问权限(允许)
                .tokenKeyAccess("permitAll()")
                // 开启端口/oauth/check_token的访问权限(允许)
                .checkTokenAccess("permitAll()");
    }

    /**
     * 客户端详情配置,
     * 比如client_id,secret
     *
     * @param clients
     * @throws Exception
     */
    @Override
    public void configure(ClientDetailsServiceConfigurer clients) throws Exception {
        // 客户端信息存储在什么地方,可以在内存中,可以在数据库中
        // clients.inMemory()
                // 添加一个client配置,指定其client_id的密码/安全码
                // .withClient("client_rubin")
                // .secret("123456")
                // 指定客户端所能访问资源id清单,此处的资源id是需要在具体的资源服务器上也配置一样
                // .resourceIds("scn-service-auto-deliver")
                // 认证类型/令牌颁发模式,可以配置多个在这里,但是不一定都用,具体使用哪种方式颁发token,需要客户端调用的时候传递参数指定
                // .authorizedGrantTypes("password", "refresh_token")
                // 客户端的权限范围,此处配置为all全部即可
                // .scopes("all");
        // 从内存中加载客户端详情改为从数据库中加载客户端详情
        clients.withClientDetails(createJdbcClientDetailsService());
    }

    @Bean
    public JdbcClientDetailsService createJdbcClientDetailsService() {
        JdbcClientDetailsService jdbcClientDetailsService = new JdbcClientDetailsService(dataSource);
        return jdbcClientDetailsService;
    }

    /**
     * 认证服务器是玩转token的,那么这里配置token令牌管理相关(token此时就是一个字符串,当下的token需要在服务器端存储,那么存储在哪里呢?都是在这里配置)
     *
     * @param endpoints
     * @throws Exception
     */
    @Override
    public void configure(AuthorizationServerEndpointsConfigurer endpoints) throws Exception {
        endpoints
                // 指定token的存储方法
                .tokenStore(tokenStore())
                // token服务的一个描述,可以认为是token生成细节的描述,比如有效时间多少等
                .tokenServices(authorizationServerTokenServices())
                // 指定认证管理器,随后注⼊一个到当前类使用即可
                .authenticationManager(authenticationManager)
                .allowedTokenEndpointRequestMethods(HttpMethod.GET, HttpMethod.POST);
    }

    /**
     * 该方法用于创建TokenStore对象(令牌存储对象)
     * 也就是说token以什么形式存储
     *
     * @return
     */
    private TokenStore tokenStore() {
        // return new InMemoryTokenStore();
        // 使用jwt令牌
        return new JwtTokenStore(jwtAccessTokenConverter());
    }

    /**
     * 返回jwt令牌转换器(帮助我们生成jwt令牌的)
     * 在这里,我们可以把签名密钥传递进去给转换器对象
     *
     * @return
     */
    private JwtAccessTokenConverter jwtAccessTokenConverter() {
        JwtAccessTokenConverter jwtAccessTokenConverter = new JwtAccessTokenConverter();
        // 签名密钥
        jwtAccessTokenConverter.setSigningKey(SIGN_KEY);
        // 验证时使用的密钥,和签名密钥保持一致
        jwtAccessTokenConverter.setVerifier(new MacSigner(SIGN_KEY));
        // 添加自定义转换器
        jwtAccessTokenConverter.setAccessTokenConverter(rubinAccessTokenConvertor);
        return jwtAccessTokenConverter;
    }

    /**
     * 该方法用于用户获取一个token服务对象(该对象描述了token有效期等信息)
     *
     * @return
     */
    private AuthorizationServerTokenServices authorizationServerTokenServices() {
        // 使用默认实现
        DefaultTokenServices defaultTokenServices = new DefaultTokenServices();
        // 是否开启令牌刷新
        defaultTokenServices.setSupportRefreshToken(true);
        defaultTokenServices.setTokenStore(tokenStore());

        // 针对jwt令牌的添加
        defaultTokenServices.setTokenEnhancer(jwtAccessTokenConverter());

        // 设置令牌有效时间(一般设置为2个小时)
        defaultTokenServices.setAccessTokenValiditySeconds(60 * 60 * 2);
        // access_token就是我们请求资源需要携带的令牌
        // 设置刷新令牌的有效时间 3天
        defaultTokenServices.setRefreshTokenValiditySeconds(259200);
        return defaultTokenServices;
    }

}
资源服务器取出JWT令牌扩展信息
我们的资源服务器也需要定义一个AccessTokenConverter类来解析额外添加的负载信息,具体代码如下:
package com.rubin.scn.service.autodeliver.config;

import org.springframework.security.oauth2.provider.OAuth2Authentication;
import org.springframework.security.oauth2.provider.token.DefaultAccessTokenConverter;
import org.springframework.stereotype.Component;

import java.util.Map;

@Component
public class RubinAccessTokenConvertor extends DefaultAccessTokenConverter {

    @Override
    public OAuth2Authentication extractAuthentication(Map<String, ?> map) {
        OAuth2Authentication oAuth2Authentication = super.extractAuthentication(map);
        // 将map放⼊认证对象中,认证对象在controller中可以拿到
        oAuth2Authentication.setDetails(map);
        return oAuth2Authentication;
    }

}
修改资源服务器配置:
package com.rubin.scn.service.autodeliver.config;

import org.springframework.beans.factory.annotation.Autowired;
import org.springframework.boot.SpringBootConfiguration;
import org.springframework.security.config.annotation.web.builders.HttpSecurity;
import org.springframework.security.config.annotation.web.configuration.EnableWebSecurity;
import org.springframework.security.config.http.SessionCreationPolicy;
import org.springframework.security.jwt.crypto.sign.MacSigner;
import org.springframework.security.oauth2.config.annotation.web.configuration.EnableResourceServer;
import org.springframework.security.oauth2.config.annotation.web.configuration.ResourceServerConfigurerAdapter;
import org.springframework.security.oauth2.config.annotation.web.configurers.ResourceServerSecurityConfigurer;
import org.springframework.security.oauth2.provider.token.TokenStore;
import org.springframework.security.oauth2.provider.token.store.JwtAccessTokenConverter;
import org.springframework.security.oauth2.provider.token.store.JwtTokenStore;

@SpringBootConfiguration
@EnableResourceServer
@EnableWebSecurity
public class ResourceServerConfig extends ResourceServerConfigurerAdapter {

    private static final String SIGN_KEY = "rubin_sign_key";

    @Autowired
    private RubinAccessTokenConvertor rubinAccessTokenConvertor;

    /**
     * 该方法用于定义资源服务器向远程认证服务器发起请求,进行token校验等事宜
     *
     * @param resources
     * @throws Exception
     */
    @Override
    public void configure(ResourceServerSecurityConfigurer resources) throws Exception {
        // 设置当前资源服务的资源id
        // resources.resourceId("scn-service-auto-deliver");
        // 定义token服务对象(token校验就应该靠token服务对象)
        // RemoteTokenServices remoteTokenServices = new RemoteTokenServices();
        // 校验端点/接口设置
        // remoteTokenServices.setCheckTokenEndpointUrl("http://127.0.0.1:9600/oauth/check_token");
        // 携带客户端id和客户端安全码
        // remoteTokenServices.setClientId("client_rubin");
        // remoteTokenServices.setClientSecret("123456");
        // 别忘了这一步
        // resources.tokenServices(remoteTokenServices);

        // jwt令牌改造
        // 无状态设置
        resources.resourceId("scn-service-auto-deliver").tokenStore(tokenStore()).stateless(true);
    }

    /**
     * 场景:一个服务中可能有很多资源(API接口)
     * 某一些API接口,需要先认证,才能访问
     * 某一些API接口,压根就不需要认证,本来就是对外开放的接口
     * 我们就需要对不同特点的接口区分对待(在当前configure方法中完成),设置是否需要经过认证
     *
     * @param http
     * @throws Exception
     */
    @Override
    public void configure(HttpSecurity http) throws Exception {
        http
                // 设置session的创建策略(根据需要创建即可)
                .sessionManagement().sessionCreationPolicy(SessionCreationPolicy.IF_REQUIRED)
                .and()
                .authorizeRequests()
                // /auto-deliver/service为前缀的请求需要认证
                .antMatchers("/auto-deliver/service/**").authenticated()
                // /auto-deliver/resume为前缀的请求需要认证
                .antMatchers("/auto-deliver/resume/**").authenticated()
                // /auto-deliver/resumes为前缀的请求需要认证
                .antMatchers("/auto-deliver/resumes").authenticated()
                // 其他请求不认证
                .anyRequest().permitAll();
    }

    /**
     * 该方法用于创建TokenStore对象(令牌存储对象)
     * 也就是说token以什么形式存储
     *
     * @return
     */
    private TokenStore tokenStore() {
        // return new InMemoryTokenStore();
        // 使用jwt令牌
        return new JwtTokenStore(jwtAccessTokenConverter());
    }

    /**
     * 返回jwt令牌转换器(帮助我们生成jwt令牌的)
     * 在这里,我们可以把签名密钥传递进去给转换器对象
     *
     * @return
     */
    private JwtAccessTokenConverter jwtAccessTokenConverter() {
        JwtAccessTokenConverter jwtAccessTokenConverter = new JwtAccessTokenConverter();
        // 签名密钥
        jwtAccessTokenConverter.setSigningKey(SIGN_KEY);
        // 验证时使用的密钥,和签名密钥保持⼀致
        jwtAccessTokenConverter.setVerifier(new MacSigner(SIGN_KEY));
        jwtAccessTokenConverter.setAccessTokenConverter(rubinAccessTokenConvertor);
        return jwtAccessTokenConverter;
    }

}
在接口中使用解析并自定义负载:
package com.rubin.scn.service.autodeliver.controller;

import com.netflix.hystrix.contrib.javanica.annotation.HystrixCommand;
import com.netflix.hystrix.contrib.javanica.annotation.HystrixProperty;
import com.rubin.scn.common.entity.RResume;
import com.rubin.scn.service.autodeliver.feign.IResumeClient;
import org.springframework.beans.factory.annotation.Autowired;
import org.springframework.cloud.client.ServiceInstance;
import org.springframework.cloud.client.discovery.DiscoveryClient;
import org.springframework.security.core.context.SecurityContextHolder;
import org.springframework.security.oauth2.provider.authentication.OAuth2AuthenticationDetails;
import org.springframework.web.bind.annotation.GetMapping;
import org.springframework.web.bind.annotation.PathVariable;
import org.springframework.web.bind.annotation.RequestMapping;
import org.springframework.web.bind.annotation.RestController;
import org.springframework.web.client.RestTemplate;

import java.util.List;
import java.util.Map;

@RestController
@RequestMapping("auto-deliver")
public class AutoDeliverController {

    @Autowired
    private RestTemplate restTemplate;

    @Autowired
    private DiscoveryClient discoveryClient;

    @Autowired
    private IResumeClient iResumeClient;

    @GetMapping("service/{id}")
    public List<ServiceInstance> getServiceInfos(@PathVariable("id") String id) {
        return discoveryClient.getInstances(id);
    }

    @GetMapping("service/ip")
    public String getIp() {
        OAuth2AuthenticationDetails oAuth2AuthenticationDetails = (OAuth2AuthenticationDetails) SecurityContextHolder.getContext().getAuthentication().getDetails();
        Map<String, Object> decodedDetails = (Map<String, Object>) oAuth2AuthenticationDetails.getDecodedDetails();
        return decodedDetails.get("clientIp").toString();
    }

    @GetMapping("resume/{userId}")
    public RResume getResumeByUserId(@PathVariable("userId") Long userId) {
        List<ServiceInstance> instances = getServiceInfos("scn-service-resume");
        ServiceInstance instance = instances.get(0);
        String host = instance.getHost();
        Integer port = instance.getPort();
        String url = new StringBuffer("http://")
                .append(host)
                .append(":")
                .append(port)
                .append("/resume/detail?userId=")
                .append(userId)
                .toString();
        RResume rResume = restTemplate.getForObject(url, RResume.class);
        return rResume;
    }

    @GetMapping("resumes")
    public List getResumes() {
        List result = restTemplate.getForObject("http://scn-service-resume/resume/list", List.class);
        return result;
    }

    @GetMapping("hello")
    public String hello() throws InterruptedException {
        return restTemplate.getForObject("http://scn-service-resume/resume/hello", String.class);
    }

    // 使用@HystrixCommand注解进行熔断控制
    @HystrixCommand(
            // 线程池标识,要保持唯一,不唯一的话就公用了
            threadPoolKey = "timeout",
            // 线程池细节属性配置
            threadPoolProperties = {
                    @HystrixProperty(name = "coreSize", value = "1"), // 线程数
                    @HystrixProperty(name = "maxQueueSize", value = "20") // 等待队列长度
            },
            // commandProperties熔断的⼀些细节属性配置
            commandProperties = {
                    @HystrixProperty(name = "execution.isolation.thread.timeoutInMilliseconds", value = "1000"),
                    // 统计时间窗口长度
                    @HystrixProperty(name = "metrics.rollingStats.timeInMilliseconds", value = "8000"),
                    // 统计时间窗口内的最小请求数
                    @HystrixProperty(name = "circuitBreaker.requestVolumeThreshold", value = "2"),
                    // 统计时间窗口内的最内的错误数量百分比阀值
                    @HystrixProperty(name = "circuitBreaker.errorThresholdPercentage", value = "50"),
                    // 自我修复时的活动窗口长度
                    @HystrixProperty(name = "circuitBreaker.sleepWindowInMilliseconds", value = "3000")
            },
            fallbackMethod = "rubinFallback"
    )
    @GetMapping("timeout")
    public String timeout() {
        return restTemplate.getForObject("http://scn-service-resume/resume/timeout", String.class);
    }

    public String rubinFallback() {
        return "rubin fallback.";
    }

    @GetMapping("feign")
    public String feign() {
        return iResumeClient.feign();
    }

}
至此,我们关于oauth2的知识就说完了。
写在最后
其实,我们在生产过程中,一般的解决方案是使用认证服务器来颁发以及刷新token,资源服务器和客户端约定自定义token请求头并自己解析token内容,而不是解析的逻辑也使用oauth2来完成,原因如下:
- oauth2默认的token验证方式是在原接口上加参数或者认证,这个方式太过死板,不容易扩展
- 我们使用Feign来作为HTTP客户端,对于参数的传递支持的并不友好,而对于请求头的自动传递是有现成的解决方案的
- JWT token本身的玩法很灵活,我们完全可以自己手动生成和解析来提高系统的灵活性
本博文的内容就到这里了,欢迎小伙伴们积极留言交流~~~

文章评论
收了。小弟要好好跟着大哥学习。