Sharding-Proxy简介
Sharding-Proxy是ShardingSphere的第二个产品,定位为透明化的数据库代理端,提供封装了数据库二进制协议的服务端版本,用于完成对异构语言的支持。 目前先提供MySQL版本,它可以使用任何兼容MySQL协议的访问客户端如:MySQL Command Client, MySQL Workbench等操作数据,对DBA更加友好。
其特点如下:
- 向应用程序完全透明,可直接当做MySQL使用
- 适用于任何兼容MySQL协议的客户端
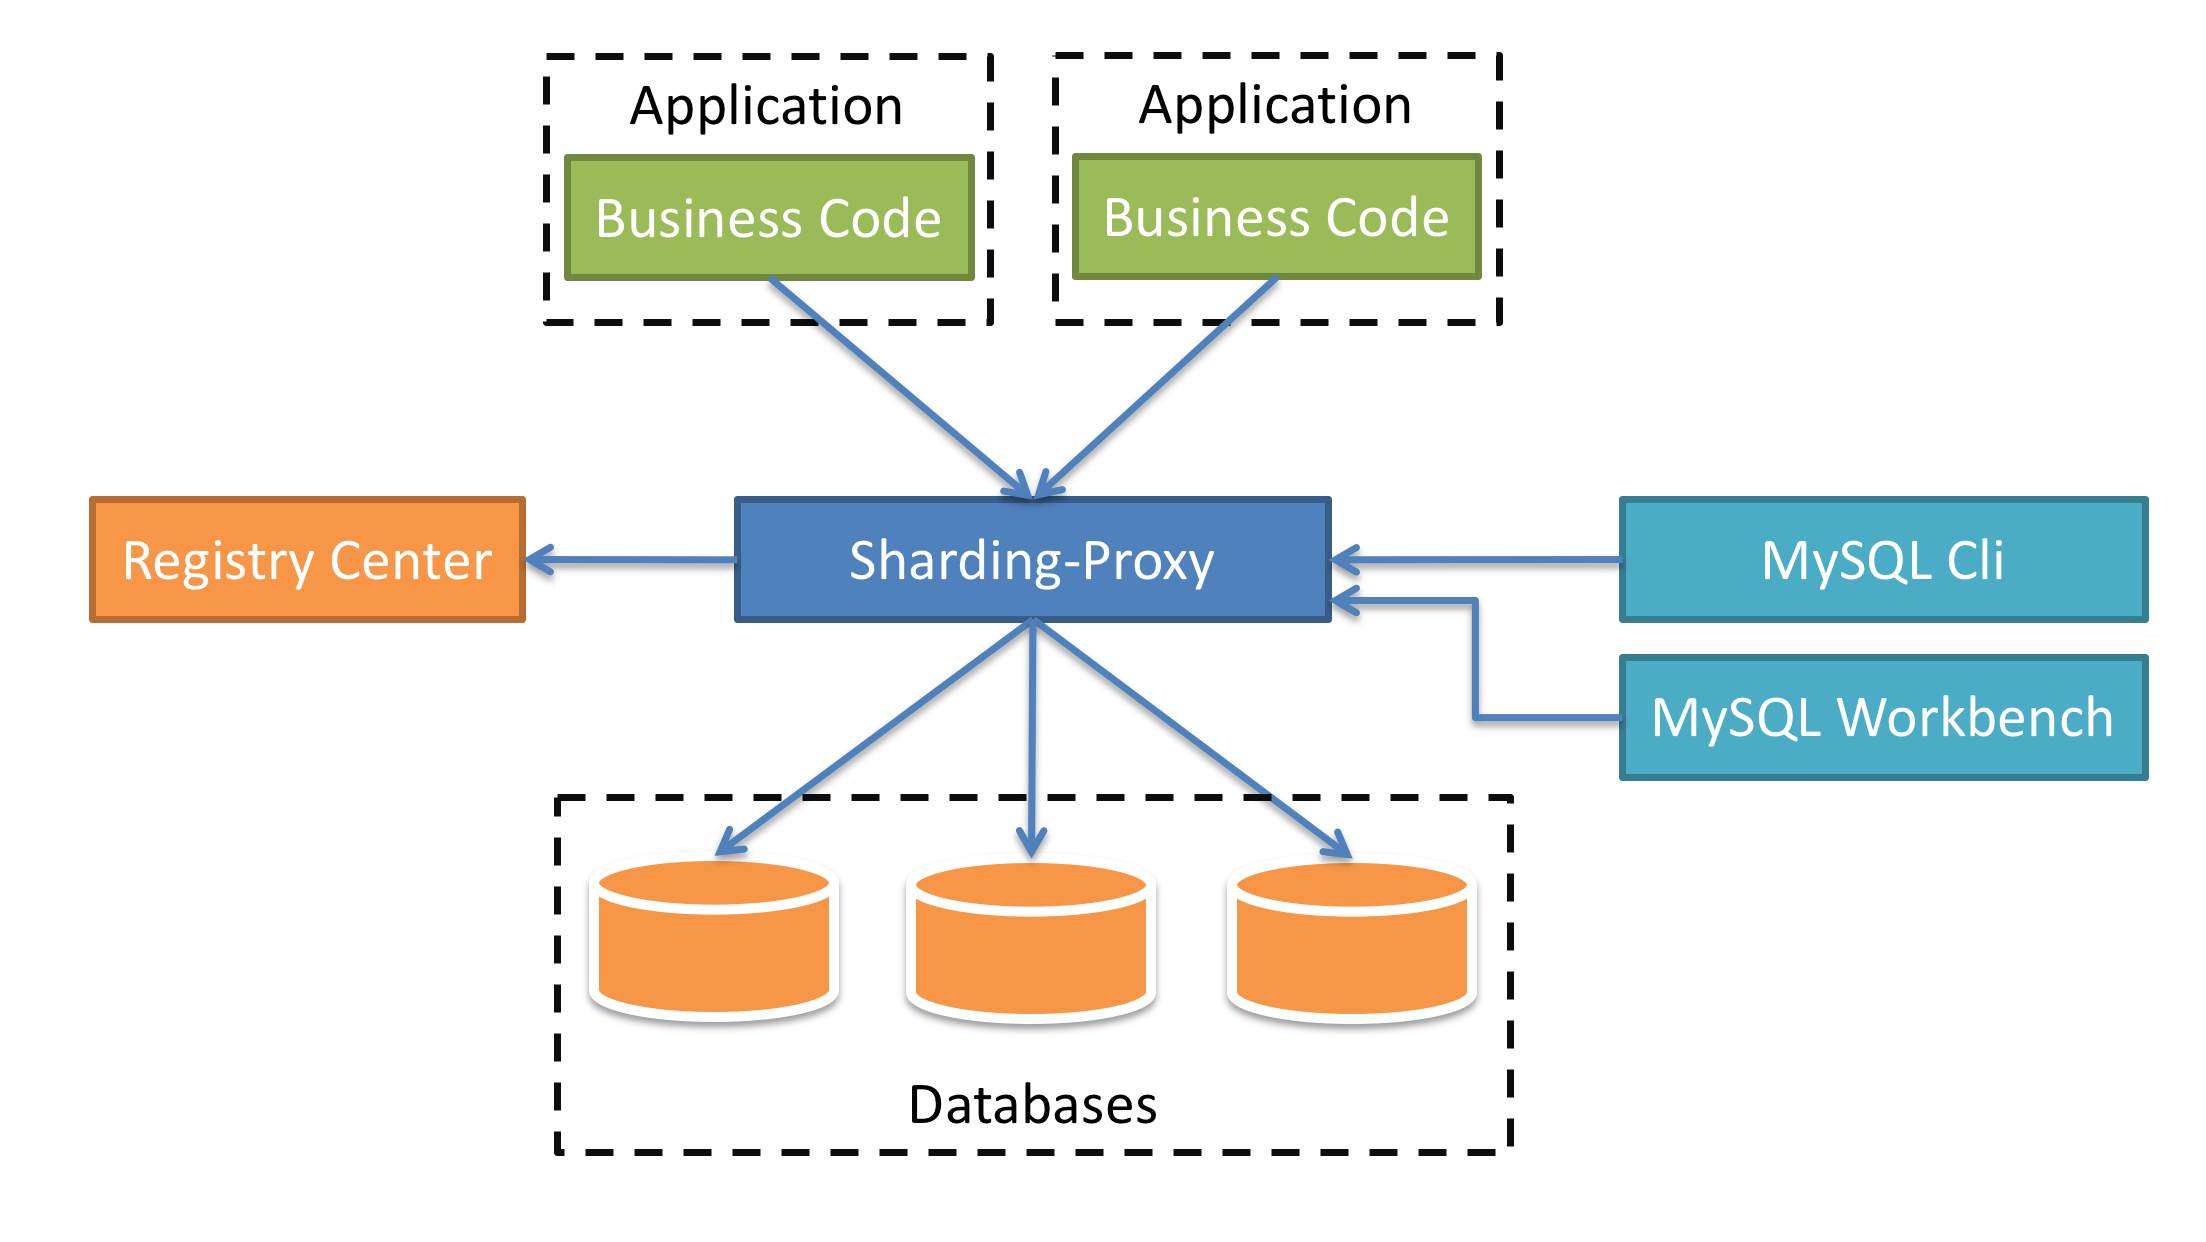
Sharding-Proxy的优势在于对异构语言的支持,以及为DBA提供可操作入口。
Sharding-Proxy安装
安装之前,我们需要先创建两个数据库rubin_shard_1和rubin_shard_2,并使用以下脚本初始化数据库:
CREATE TABLE `position`
(
    `id`     bigint(11) NOT NULL AUTO_INCREMENT,
    `name`   varchar(256) DEFAULT NULL,
    `salary` varchar(50)  DEFAULT NULL,
    `city`   varchar(256) DEFAULT NULL,
    PRIMARY KEY (`id`)
) ENGINE = InnoDB
  DEFAULT CHARSET = utf8mb4;


CREATE TABLE `position_detail`
(
    `id`          bigint(11) NOT NULL AUTO_INCREMENT,
    `pid`         bigint(11) NOT NULL DEFAULT '0',
    `description` text                DEFAULT NULL,
    PRIMARY KEY (`id`)
) ENGINE = InnoDB
  DEFAULT CHARSET = utf8mb4;
我们可以在官网或者附件中下载对应系统(Linux是tar.gz,Windows是zip)的压缩包并解压。
解压后我们修改conf/server.yaml和以config-前缀开头的文件,进行分片规则、读写分离规则配置。配置项和Sharding-JDBC的无差别,在此不赘述。感兴趣的小伙伴可以前往本站关于Sharding-JDBC的博文进行学习。下面给出一组配置示例:
- conf/server.yaml
#
# Licensed to the Apache Software Foundation (ASF) under one or more
# contributor license agreements.  See the NOTICE file distributed with
# this work for additional information regarding copyright ownership.
# The ASF licenses this file to You under the Apache License, Version 2.0
# (the "License"); you may not use this file except in compliance with
# the License.  You may obtain a copy of the License at
#
#     http://www.apache.org/licenses/LICENSE-2.0
#
# Unless required by applicable law or agreed to in writing, software
# distributed under the License is distributed on an "AS IS" BASIS,
# WITHOUT WARRANTIES OR CONDITIONS OF ANY KIND, either express or implied.
# See the License for the specific language governing permissions and
# limitations under the License.
#

######################################################################################################
#
# If you want to configure orchestration, authorization and proxy properties, please refer to this file.
#
######################################################################################################
#
#orchestration:
#  orchestration_ds:
#    orchestrationType: registry_center,config_center,distributed_lock_manager
#    instanceType: zookeeper
#    serverLists: localhost:2181
#    namespace: orchestration
#    props:
#      overwrite: false
#      retryIntervalMilliseconds: 500
#      timeToLiveSeconds: 60
#      maxRetries: 3
#      operationTimeoutMilliseconds: 500
#
authentication:
  users:
    root:
      password: 123456
#    sharding:
#      password: sharding
      authorizedSchemas: rubin_shard
#
props:
  max.connections.size.per.query: 1
  acceptor.size: 16  # The default value is available processors count * 2.
  executor.size: 16  # Infinite by default.
  proxy.frontend.flush.threshold: 128  # The default value is 128.
#    # LOCAL: Proxy will run with LOCAL transaction.
#    # XA: Proxy will run with XA transaction.
#    # BASE: Proxy will run with B.A.S.E transaction.
  proxy.transaction.type: XA
  proxy.opentracing.enabled: false
  proxy.hint.enabled: false
  query.with.cipher.column: true
  sql.show: true
  allow.range.query.with.inline.sharding: false
- conf/config-sharding.yaml
#
# Licensed to the Apache Software Foundation (ASF) under one or more
# contributor license agreements.  See the NOTICE file distributed with
# this work for additional information regarding copyright ownership.
# The ASF licenses this file to You under the Apache License, Version 2.0
# (the "License"); you may not use this file except in compliance with
# the License.  You may obtain a copy of the License at
#
#     http://www.apache.org/licenses/LICENSE-2.0
#
# Unless required by applicable law or agreed to in writing, software
# distributed under the License is distributed on an "AS IS" BASIS,
# WITHOUT WARRANTIES OR CONDITIONS OF ANY KIND, either express or implied.
# See the License for the specific language governing permissions and
# limitations under the License.
#

######################################################################################################
#
# Here you can configure the rules for the proxy.
# This example is configuration of sharding rule.
#
# If you want to use sharding, please refer to this file;
# if you want to use master-slave, please refer to the config-master_slave.yaml.
#
######################################################################################################
#
schemaName: rubin_shard
#
dataSources:
  ds_0:
    url: jdbc:mysql://aliyun-db-host:3306/rubin_shard_1?characterEncoding=utf8&serverTimezone=Asia/Shanghai&useSSL=false&allowPublicKeyRetrieval=true
    username: root
    password: 123456
    connectionTimeoutMilliseconds: 30000
    idleTimeoutMilliseconds: 60000
    maxLifetimeMilliseconds: 1800000
    maxPoolSize: 50
  ds_1:
    url: jdbc:mysql://aliyun-db-host:3306/rubin_shard_2?characterEncoding=utf8&serverTimezone=Asia/Shanghai&useSSL=false&allowPublicKeyRetrieval=true
    username: root
    password: 123456
    connectionTimeoutMilliseconds: 30000
    idleTimeoutMilliseconds: 60000
    maxLifetimeMilliseconds: 1800000
    maxPoolSize: 50
#
shardingRule:
  tables:
    position:
      actualDataNodes: ds_${0..1}.position
      databaseStrategy:
        inline:
          shardingColumn: id
          algorithmExpression: ds_$->{id % 2}
      keyGenerator:
        type: SNOWFLAKE
        column: id
    position_detail:
      actualDataNodes: ds_${0..1}.position_detail
      databaseStrategy:
        inline:
          shardingColumn: pid
          algorithmExpression: ds_$->{pid % 2}
      keyGenerator:
        type: SNOWFLAKE
        column: id
  bindingTables:
    - position,position_detail
#  defaultDatabaseStrategy:
#    inline:
#      shardingColumn: user_id
#      algorithmExpression: ds_${user_id % 2}
#  defaultTableStrategy:
#    none:

######################################################################################################
#
# If you want to connect to MySQL, you should manually copy MySQL driver to lib directory.
#
######################################################################################################

#schemaName: sharding_db
#
#dataSources:
#  ds_0:
#    url: jdbc:mysql://127.0.0.1:3306/demo_ds_0?serverTimezone=UTC&useSSL=false
#    username: root
#    password:
#    connectionTimeoutMilliseconds: 30000
#    idleTimeoutMilliseconds: 60000
#    maxLifetimeMilliseconds: 1800000
#    maxPoolSize: 50
#  ds_1:
#    url: jdbc:mysql://127.0.0.1:3306/demo_ds_1?serverTimezone=UTC&useSSL=false
#    username: root
#    password:
#    connectionTimeoutMilliseconds: 30000
#    idleTimeoutMilliseconds: 60000
#    maxLifetimeMilliseconds: 1800000
#    maxPoolSize: 50
#
#shardingRule:
#  tables:
#    t_order:
#      actualDataNodes: ds_${0..1}.t_order_${0..1}
#      tableStrategy:
#        inline:
#          shardingColumn: order_id
#          algorithmExpression: t_order_${order_id % 2}
#      keyGenerator:
#        type: SNOWFLAKE
#        column: order_id
#    t_order_item:
#      actualDataNodes: ds_${0..1}.t_order_item_${0..1}
#      tableStrategy:
#        inline:
#          shardingColumn: order_id
#          algorithmExpression: t_order_item_${order_id % 2}
#      keyGenerator:
#        type: SNOWFLAKE
#        column: order_item_id
#  bindingTables:
#    - t_order,t_order_item
#  defaultDatabaseStrategy:
#    inline:
#      shardingColumn: user_id
#      algorithmExpression: ds_${user_id % 2}
#  defaultTableStrategy:
#    none:
这里需要注意:shardingRule.bindingTables。该配置主要是配置主从表的绑定,配置之后将不会产生笛卡尔积查询,而是根据数据源进行关联查询。
配置之后,我们就需要启动连接数据库了。但是因为我们要连接MySQL数据库,需要下载MySQL驱动, 解压缩后将mysql-connector-java-5.1.48.jar拷贝到${sharding-proxy}\lib目录。如果要连接PostgreSQL数据库,就不需要引入额外依赖了。
Linux操作系统请运行bin/start.sh,Windows操作系统请运行bin/start.bat来启动Sharding-Proxy。
使用默认配置启动:${sharding-proxy}\bin\start.sh
配置端口启动:${sharding-proxy}\bin\start.sh ${port}
使用客户端工具连接。如: mysql -h 127.0.0.1 -P 3307 -u root -p root。这里需要注意,我们最好使用客户端连接工具来连接,博主测试使用Navcat连接会显示所有数据库,不是预期的配置数据库。
若想使用Sharding-Proxy的数据库治理功能,则需要使用注册中心实现实例熔断和从库禁用功能。Sharding-Proxy默认提供了Zookeeper的注册中心解决方案。只需按照配置规则进行注册中心的配置,即可使用。
注意事项:
- Sharding-Proxy 默认不支持hint,如需支持,请在conf/server.yaml中,将props的属性proxy.hint.enabled设置为true。在Sharding-Proxy中,
HintShardingAlgorithm的泛型只能是String类型 - Sharding-Proxy默认使用3307端口,可以通过启动脚本追加参数作为启动端口号。如:
bin/start.sh 3308 - Sharding-Proxy使用conf/server.yaml配置注册中心、认证信息以及公用属性
- Sharding-Proxy支持多逻辑数据源,每个以"config-"做前缀命名yaml配置文件,即为一个逻辑数据源
Sharding-Proxy实战
下面我们通过一个简单的案例来连接并使用一下 Sharding-Proxy的分库分表和分布式事务功能。我们新建一个SpringBoot工程sharding-proxy-demo,其pom文件如下:
<?xml version="1.0" encoding="UTF-8"?>
<project xmlns="http://maven.apache.org/POM/4.0.0"
         xmlns:xsi="http://www.w3.org/2001/XMLSchema-instance"
         xsi:schemaLocation="http://maven.apache.org/POM/4.0.0 http://maven.apache.org/xsd/maven-4.0.0.xsd">
    <modelVersion>4.0.0</modelVersion>
    <parent>
        <groupId>org.springframework.boot</groupId>
        <artifactId>spring-boot-starter-parent</artifactId>
        <version>2.2.5.RELEASE</version>
        <relativePath/>
    </parent>
    <groupId>com.rubin</groupId>
    <artifactId>sharding-proxy-demo</artifactId>
    <version>1.0-SNAPSHOT</version>

    <properties>
        <java.version>1.8</java.version>
        <project.build.sourceEncoding>UTF-8</project.build.sourceEncoding>
        <project.compile.sourceEncoding>UTF-8</project.compile.sourceEncoding>
    </properties>

    <dependencies>

        <dependency>
            <groupId>org.springframework.boot</groupId>
            <artifactId>spring-boot-starter-web</artifactId>
        </dependency>

        <dependency>
            <groupId>org.springframework.boot</groupId>
            <artifactId>spring-boot-starter-jdbc</artifactId>
        </dependency>

        <dependency>
            <groupId>org.springframework.boot</groupId>
            <artifactId>spring-boot-starter-data-jpa</artifactId>
        </dependency>

        <dependency>
            <groupId>org.springframework.boot</groupId>
            <artifactId>spring-boot-starter-test</artifactId>
            <scope>test</scope>
        </dependency>

        <dependency>
            <groupId>org.projectlombok</groupId>
            <artifactId>lombok</artifactId>
            <version>1.18.22</version>
        </dependency>

        <dependency>
            <groupId>mysql</groupId>
            <artifactId>mysql-connector-java</artifactId>
            <version>5.1.48</version>
        </dependency>

        <dependency>
            <groupId>org.springframework.boot</groupId>
            <artifactId>spring-boot-starter-web</artifactId>
        </dependency>

    </dependencies>

    <build>
        <plugins>
            <plugin>
                <groupId>org.springframework.boot</groupId>
                <artifactId>spring-boot-maven-plugin</artifactId>
                <configuration>
                    <excludes>
                        <exclude>
                            <groupId>org.projectlombok</groupId>
                            <artifactId>lombok</artifactId>
                        </exclude>
                    </excludes>
                </configuration>
            </plugin>
        </plugins>
    </build>

</project>
配置文件如下:
spring.datasource.platform=mysql
spring.datasource.driver-class-name=com.mysql.jdbc.Driver
spring.datasource.url=jdbc:mysql://127.0.0.1:3307/rubin_shard?characterEncoding=utf8&serverTimezone=Asia/Shanghai&useSSL=false&allowPublicKeyRetrieval=true
spring.datasource.username=root
spring.datasource.password=123456
创建JPA的实体和Repository:
package com.rubin.shardingproxydemo.entity;

import lombok.Data;

import javax.persistence.*;
import java.io.Serializable;

@Data
@Entity
@Table(name = "position")
public class Position implements Serializable {

    @Id
    @Column(name = "id")
    @GeneratedValue(strategy = GenerationType.IDENTITY)
    private long id;

    @Column(name = "name")
    private String name;

    @Column(name = "salary")
    private String salary;

    @Column(name = "city")
    private String city;

}
package com.rubin.shardingproxydemo.entity;

import lombok.Data;

import javax.persistence.*;
import java.io.Serializable;

@Data
@Entity
@Table(name = "position_detail")
public class PositionDetail implements Serializable {

    @Id
    @Column(name = "id")
    @GeneratedValue(strategy = GenerationType.IDENTITY)
    private long id;

    @Column(name = "pid")
    private long pid;

    @Column(name = "description")
    private String description;

}
package com.rubin.shardingproxydemo.respository;

import com.rubin.shardingproxydemo.entity.Position;
import org.springframework.data.jpa.repository.JpaRepository;

public interface PositionRepository extends JpaRepository<Position, Long> {

}
package com.rubin.shardingproxydemo.respository;

import com.rubin.shardingproxydemo.entity.PositionDetail;
import org.springframework.data.jpa.repository.JpaRepository;

public interface PositionDetailRepository extends JpaRepository<PositionDetail, Long> {
}
创建对应的业务处理类和接口类:
package com.rubin.shardingproxydemo.service;

import com.rubin.shardingproxydemo.entity.Position;
import com.rubin.shardingproxydemo.entity.PositionDetail;
import com.rubin.shardingproxydemo.respository.PositionDetailRepository;
import com.rubin.shardingproxydemo.respository.PositionRepository;
import org.springframework.beans.factory.annotation.Autowired;
import org.springframework.stereotype.Service;
import org.springframework.transaction.annotation.Transactional;

@Service
public class TransactionService {

    @Autowired
    private PositionRepository positionRepository;

    @Autowired
    private PositionDetailRepository positionDetailRepository;

    @Transactional(rollbackFor = Exception.class)
    public void commit() {
        for (int i = 1; i <= 5; i++) {
            Position position = new Position();
            position.setName("root" + i);
            position.setSalary("1000000");
            position.setCity("beijing");
            positionRepository.save(position);
            PositionDetail positionDetail = new PositionDetail();
            positionDetail.setPid(position.getId());
            positionDetail.setDescription("this is a root " + i);
            positionDetailRepository.save(positionDetail);
        }
    }

    @Transactional(rollbackFor = Exception.class)
    public void rollback() {
        for (int i = 1; i <= 5; i++) {
            Position position = new Position();
            position.setName("root" + i);
            position.setSalary("1000000");
            position.setCity("beijing");
            positionRepository.save(position);

            if (i == 3) {
                throw new RuntimeException("人为制造异常");
            }

            PositionDetail positionDetail = new PositionDetail();
            positionDetail.setPid(position.getId());
            positionDetail.setDescription("this is a root " + i);
            positionDetailRepository.save(positionDetail);
        }
    }

}
package com.rubin.shardingproxydemo.controller;

import com.rubin.shardingproxydemo.service.TransactionService;
import org.springframework.beans.factory.annotation.Autowired;
import org.springframework.web.bind.annotation.GetMapping;
import org.springframework.web.bind.annotation.RestController;

@RestController
public class TransactionController {

    @Autowired
    private TransactionService transactionService;

    @GetMapping("commit")
    public String commit() {
        transactionService.commit();
        return "ok";
    }

    @GetMapping("rollback")
    public String rollback() {
        try {
            transactionService.rollback();
        } catch (Exception e) {
            e.printStackTrace();
        }
        return "ok";
    }

}
我们先来创建测试类,来观察一下我们之前配置的分库分表的情况是否正常。测试类如下:
package com.rubin.shardingproxydemo;

import com.rubin.shardingproxydemo.entity.Position;
import com.rubin.shardingproxydemo.entity.PositionDetail;
import com.rubin.shardingproxydemo.respository.PositionDetailRepository;
import com.rubin.shardingproxydemo.respository.PositionRepository;
import org.junit.Test;
import org.junit.runner.RunWith;
import org.springframework.beans.factory.annotation.Autowired;
import org.springframework.boot.test.context.SpringBootTest;
import org.springframework.test.context.junit4.SpringRunner;
import org.springframework.util.CollectionUtils;

import java.util.List;

@SpringBootTest(classes = ShardingProxyDemoApplication.class)
@RunWith(SpringRunner.class)
public class TestShardingDatabase {

    @Autowired
    private PositionRepository positionRepository;

    @Autowired
    private PositionDetailRepository positionDetailRepository;

    @Test
    public void testFindAll() {
        List<Position> positionList = positionRepository.findAll();
        if (!CollectionUtils.isEmpty(positionList)) {
            positionList.stream().forEach(System.out::println);
        }
    }

    @Test
    public void insertTest() {
        for (int i = 1; i <= 5; i++) {
            Position position = new Position();
            position.setName("root" + i);
            position.setSalary("1000000");
            position.setCity("beijing");
            positionRepository.save(position);
            PositionDetail positionDetail = new PositionDetail();
            positionDetail.setPid(position.getId());
            positionDetail.setDescription("this is a root " + i);
            positionDetailRepository.save(positionDetail);
        }
    }

}
运行之后我们会发现两个数据库均按照id的分片规则录入了数据,并且查询可以查询出两个数据源的全部数据。
接下来我们测试一下分布式事务,我们在上面的配置中已经配置了分布式事务的类型为XA(目前默认只支持XA,想要支持柔性事务需要手动将所有关联jar包放入lib文件夹中)。
我们启动项目,访问以下链接:
会发现我们的分布式事务是生效的。
本文的内容就到这里了。欢迎小伙伴们积极留言交流~~~
附件
链接:https://pan.rubinchu.com/share/1458690427132575744
提取码:dvrg

文章评论